• The Mombot
  • Gift Guides
  • My Story
  • Food & Drink
  • Life
  • Home
  • DIY
  • Mama Style
  • Shop

The Mombot

Motherhood Simplified.

DIY Dora and Boots costumes

September 8, 2014 | 2 Comments

DIY Dora and Boots Costumes | TheMombot.com

Last year my daughter insisted on being Dora for Halloween. I happily obliged, knowing it would be an easy costume to put together. And then I realized I could make Lincoln a Boots costume and all would be right with the world.

Let’s not talk about the fact that when I put Mia in her costume come Halloween day, she cried and said she didn’t want to be Dora. Oh, 3 year olds.

Anyway, their costumes turned out cute and I convinced her to wear it in the end (even though when I went to pick her up from school she wasn’t wearing her shorts and was prancing around in white tights completely pantsless).

The Dora costume was really easy to pull together. I planned on buying it all, but couldn’t find orange shorts anywhere (surprising…), so I ended up making them. Here’s what I bought/created for her costume:

DIY Dora and Boots Costumes | TheMombot.com

DIY Dora Costume Supplies:

  • Pink t-shirt ($6 from Amazon)
  • Black wig ($7 from Target, they do actually make official Dora wigs here)
  • Orange shorts (DIYed: I used a current pair of shorts she owned and made a pattern, then made them with orange knit fabric and elastic)
  • White tights
  • Official Dora backpack ($11 on Amazon)
  • Pink shoes (technically, Dora wears yellow socks and white shoes, but I would never buy my daughter white shoes because they would be instantly trashed and I couldn’t find yellow socks anywhere, so I decided to go my own route – plus the tights were necessary due to cold weather)

DIY Boots Costume

For Lincoln’s costume, I decided I would make the entire thing. I used all fleece, knowing it wouldn’t be too expensive, it would be warm for nighttime trick-or-treating, and I wouldn’t have to hem it.

DIY Dora and Boots Costumes | TheMombot.com

To make main costume piece:

To make the costume, I wanted a one-piece outfit, so I used a pair of his pajamas to create the pattern. To do this yourself, just fold the front piece of the pajamas in half down the center front and place on top of fabric folded in half. Match up the center front of the pajamas with the fold in the fabric.

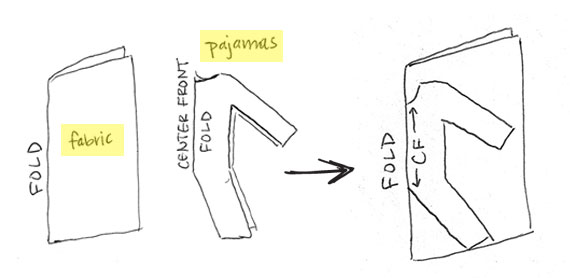
Then trace around your pajamas. I added about a 1/2″ all the way around since fleece doesn’t have as much give as the knit in the pajamas, and then another 1/2″ for seam allowance where necessary (everywhere but neck, wrist cuffs and pant cuffs).

I followed the same process to create the back piece of the costume using the back side of the pajamas as the pattern, but then I added 1/2″ at the center back and cut down the center back so that I had two pieces. I did this so I could insert the tail and so I could add in a velcro panel to close the costume.

DIY Dora and Boots Costumes | TheMombot.com

Before I sewed the front and back together, I cut a yellow oval out of fleece for the belly on the front side, pinned it in place, and stitched around the edges to attach it. For the back, I pinned the tail in the appropriate place and then sewed the two back pieces together halfway up (starting at the crotch, ending around the lower back). The tail is just a rectangular tube made from yellow and purple fleece, turned right side out. With the top half of the back, I sewed velcro on each piece to create a closure (see image above).

DIY Dora and Boots Costumes | TheMombot.com

The red boots:

I would have preferred to just buy red boots, but couldn’t find any, so I made boot covers from red fleece instead. I could have attached these to the costume, but decided it was easier not to. I used paper to create a pattern piece by laying it on top of the boot and molding it, drawing and cutting (it was all very scientific). Once I had a piece of paper that adequately covered the top of his foot, I used it as a pattern piece and cut out my red covers. They were two pieces; one that covered the foot part of the boot, and a rectangular piece that wrapped around the height of the boot, closed with velcro and tucked into the top of the boot. They were pretty poorly made, but I knew he’s only be wearing them once, so I didn’t really care.

The hat:

The hat was a little difficult. I used a winter hat that Lincoln already owned as the pattern, but I discovered later that the hat no longer fit him and was a bit small, so I had to add in a panel at back of his head to make it fit (as you can see in the photos). I also had to add seams to insert the ears and Boots’ little hair piece. To make the ears and hair piece stand up, I created them out of two pieces of fleece, sewn together and turned right side out, and then inserted shapes cut from plastic template sheets for stability- it worked like a charm. I would give more details on how I created the hat, but it was truly a “make it work” moment, so I wouldn’t be of much help… My best advice is to find a hat in a similar shape and trace it as a pattern.

Because I didn’t have to hem anything, the costume didn’t take long to make. It wasn’t perfect, but it worked for the one day that he wore it! And in my opinion, he looks pretty darn cute.

More DIY Halloween Costume Ideas:

  • More DIY Halloween Costumes
  • Easy DIY Halloween Costumes
  • DIY Owl Halloween Costumes
  • DIY Woodland Creatures & Lumberjack Costumes
  • DIY Little Bo Peep and Her Sheep Costumes
  • DIY LEGO Ninjago Halloween Costume

*Disclosure: Post contains affiliate links


Related posts:

  1. DIY owl Halloween costume
  2. DIY pumpkin tee for $1 (No-Sew)
  3. Little Bo Peep and her sheep Halloween costumes
  4. DIY floral headband

Filed Under: crafting Tagged With: Halloween, sewing

  • Email
  • Facebook
  • Instagram
  • Pinterest
  • RSS
  • Twitter

HI! I'M AMY.

I'M A BLOGGER, GRAPHIC DESIGNER, MOM, COFFEE ADDICT, DIYER, CHRONIC MULTITASKER AND STRESSCASE, A COOK AND A LOVER OF A GOOD GLASS OF WINE.
LEARN MORE ABOUT ME

Shop My Paper Line:

Favorites:

Instagram:

I get it. It's a little weird. But the girls I've I get it. It's a little weird.
But the girls I've seen do it best, look adorable.

I think it looks best with an oversized tee or sweatshirt, tennies or slides, and a small crossbody bag.

You can't argue with comfort.

For the record, these are women's sleep shorts that I've had a couple of years from Old Navy. If you buy actual men's boxers, you might consider sewing up the pee pocket 😜

Don't spend a lot on this trend; these shorts are made from the thinnest of fabric and shouldn't cost much. Don't be fooled by a retailer that wants you to spend just because it's trendy.

But if you see some cute boxers and want to give it a go - then do! Bonus - if/when the trend ends, you'll have pajamas on the ready 👏

It's solid weekend wear, but I'm not going out to dinner in it...

#boxershortsforgirls #boxershort #ootd #womensfashion #styleinspiration
Another project down in my son's room! I knew I w Another project down in my son's room!

I knew I wanted some sort of built-in feature in this bedroom, but it was hard to figure out what, because we turned it into an active space where he could run and play and needed a lot of room.

So I settled on a built-in bookcase with the slatted design feature, which I'm in love with!

The best part about it is that if he ever decides to upgrade his bed, the space will also accommodate a full or queen size bed going in the opposite direction. It adds so much interest to this room and hopefully will be here for a long time!

One of the things I love most about DIY projects is figuring out how to make something - it's like a giant puzzle. I saw photos of these slotted wall room dividers on Pinterest and just figured it out as I went. All in all, I had very few hiccups and it only took me a few hours to put together. I think I only cursed once?!? And so I call that an extreme DIY win...

Now that the sports wall, the climbing wall, and the built-in feature are complete, the last thing to do in here is some additional painting. I'm thinking of using a contrasting blue color for the closet doors and back side of the built-in, and perhaps trimming out the window with it as well. Then I need to switch out the light for a fan and this.room.is done 🙌

Details: I used two IKEA billy bookshelves, screwed together and secured to the wall. Then wrapped them in white oak plywood. I ripped down 2x4s into 1.5x1.5" square dowels (heavily sanded!) and used pocket holes on the back side of each to secure to the bookshelf and the 1x4 in the ceiling. It's very sturdy!

Go back in my reels to see the other projects from this room! 

#diy #boysroom #roomrenovation #roomrefresh #kidsrooms #climbingwall #soccerbedroom #builtins #bedroomredo #girlswhobuild
This climbing wall took half a day and cost under This climbing wall took half a day and cost under $100!

We are lucky enough to have 13' ceilings in our bedrooms, so a climbing wall seemed to make sense in my son's room as we worked on the remodel.

He is a super active kid with #ADHD, so his room redo has involved lots of activity spaces! Go back in my reels to see past projects and follow to see me finish this up!

#diy #roomrenovation #roomrefresh #kidsrooms #climbingwall #soccerbedroom
Another to-do checked off my list for spring break Another to-do checked off my list for spring break room makeover!

I added very subtle striping to the wall to mimic a soccer field and keep things classy. ⚽

Stick around to see the next project - a climbing wall!

(And go back in my reels to see the sports wall)

#roommakeover #soccer #kidsroom

Popular Posts:

Ikea Hack: DIY Mudroom Benches
Felt Food Patterns (Link Love)
Babyproofing the stair railings with plexiglass
Free printable Father’s Day questionnaires for dad and grandpa

Recent Posts

  • Functional and Stylish Small Entryway Ideas for a Welcoming Space
  • Pendant & Accent Lights Under $100
  • DIY Stenciled Concrete Floors: Laundry Room Update Part 1
  • First Day and Last Day of School Questionnaire (free printables)
  • How to Create Canvas Wall Art from Digital Photos

>> ABOUT ME
>> DISCLOSURE STATEMENT
>> CONTACT ME

Copyright © 2025 themombot.com
Terms of Service // Privacy Policy