• The Mombot
  • Gift Guides
  • My Story
  • Food & Drink
  • Life
  • Home
  • DIY
  • Mama Style
  • Shop

The Mombot

Motherhood Simplified.

Stylishly babyproofing your stairs and home

August 11, 2013 | Leave a Comment

This is the first time we’ve lived someplace with stairs. I love that the kids sleep upstairs and we no longer have to tiptoe around the house during naps and post bedtime, but I hate that the kids are OBSESSED with climbing up and down them. I am also totally neurotic and afraid they will fall down to their deaths… but that’s another story of paranoia.

My 3 and a half year old does well going up and down (holding the railing EVERY time, of course) and I don’t worry about her so much; but my 1 year old is obviously still very clumsy. The other day he flipped forward and would have landed on his head had I not been there to catch him (insert panic attack here).

We have baby gates, but because of the way our railing and banister are set up, they just aren’t working. The wooden rails on the banister can’t handle the pressure gates, so that’s out. And because of the height of the railing and the baseboards, we are having a hard time finding one to fit the space, anyway.

This dilemma (and my neurosis) recently prompted me to look up some other babyproofing solutions. And since I hate babyproofing anyway because it makes a cute house ugly, I decided to throw the word “stylish” into my little google search.

Bazinga! (is that a word, and if so, how do you spell it?) I found some great solutions! Here’s what I came across:

DIY baby gate from door

Stylish babyproofing options | TheMombot.com

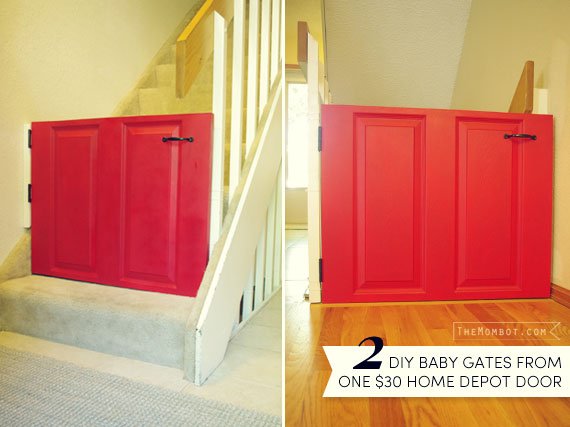
While searching for baby gate options, I came across this DIY baby gate made from an old door on The Girls With Glasses, and I was immediately smitten. We are in the process of making our own as we speak for both the stairs leading up to the 3rd story and the stairs leading down to the basement. I love that these use hinges and a hook & eye lock instead of pressure to keep little ones from getting through, and it will totally work with our railings (with some creative adjustments).

P.S. If you rent and can’t drill into the railing to create a gate like this (or if you own and just don’t want to), I found this great idea of attaching trim to the post with clear zip ties and drilling into it instead – duh! So smart!

///  U P D A T E  ///

08.26.13  We created our own baby gates (2) from one $30 Home Depot door! See the DIY:

DIY baby gates

Open railing guard

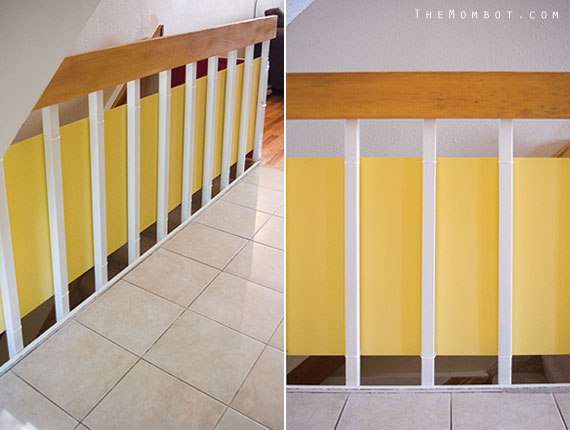
We also needed a solution for covering the open railing for our basement stairs, because Lincoln could fit right in between the gaps. The previous owners had this horrible black plastic net attached to it with zip ties; it looked atrocious. We quickly cut that down and put up our octagon playgate along the railing for a quick fix. I came across this idea on Aparment Therapy for installing a product like frosted plexiglass that I loved:

Stylish babyproofing options | TheMombot.com

So pretty, right? However, this product is really expensive and we also can not drill into our railing to hang it because we rent. So, I decided to purchase a clear plastic banister shield instead (specifically this Clear KidKusion Banister Guard). It will be fairly undetectable against the stairs, and although it’s not as stylish as the option above, I think it’s leaps and bounds beyond the black netting.

Stylish babyproofing options | TheMombot.com

///  U P D A T E  ///

08.15.14  We created our own railing guards for $9! See the DIY:

DIY railing guards

Foam padding for sharp banister edges

Finally, we needed to do something about the edges of the banisters. They are cut at an angle and at just the right height for the kids to run right into if they aren’t paying attention (which, let’s face it, is every day with these two clumsy kids). The previous owners decided that pipe foam and double stick tape was a good solution… classy, no? I, on the other hand, decided perhaps an actual foam banister guard product would be a better idea. I ended up purchasing this chocolate colored one by Prince Lionheart so it will blend in with the railing and still have some cushiony protection.

Stylish babyproofing options | TheMombot.com
tough choice.

Hopefully these solutions won’t detract too much from our decor, but blend in or even enhance it (in the case of the DIY gates, anyway). I’ll be sure and share photos when we’ve got them up, but for now, I just wanted to encourage you to think outside the box in case you were putting off babyproofing because of the ugly factor (like myself).


*Disclosure: Some affiliate links used

Related posts:

  1. Baby boy nursery
  2. Babyproofing the stair railings with plexiglass
  3. Boy’s tribal-inspired nursery
  4. Stylish staircase babyproofing: An update

Filed Under: crafting Tagged With: baby, home

  • Email
  • Facebook
  • Instagram
  • Pinterest
  • RSS
  • Twitter

HI! I'M AMY.

I'M A BLOGGER, GRAPHIC DESIGNER, MOM, COFFEE ADDICT, DIYER, CHRONIC MULTITASKER AND STRESSCASE, A COOK AND A LOVER OF A GOOD GLASS OF WINE.
LEARN MORE ABOUT ME

Shop My Paper Line:

Favorites:

Instagram:

I get it. It's a little weird. But the girls I've I get it. It's a little weird.
But the girls I've seen do it best, look adorable.

I think it looks best with an oversized tee or sweatshirt, tennies or slides, and a small crossbody bag.

You can't argue with comfort.

For the record, these are women's sleep shorts that I've had a couple of years from Old Navy. If you buy actual men's boxers, you might consider sewing up the pee pocket 😜

Don't spend a lot on this trend; these shorts are made from the thinnest of fabric and shouldn't cost much. Don't be fooled by a retailer that wants you to spend just because it's trendy.

But if you see some cute boxers and want to give it a go - then do! Bonus - if/when the trend ends, you'll have pajamas on the ready 👏

It's solid weekend wear, but I'm not going out to dinner in it...

#boxershortsforgirls #boxershort #ootd #womensfashion #styleinspiration
Another project down in my son's room! I knew I w Another project down in my son's room!

I knew I wanted some sort of built-in feature in this bedroom, but it was hard to figure out what, because we turned it into an active space where he could run and play and needed a lot of room.

So I settled on a built-in bookcase with the slatted design feature, which I'm in love with!

The best part about it is that if he ever decides to upgrade his bed, the space will also accommodate a full or queen size bed going in the opposite direction. It adds so much interest to this room and hopefully will be here for a long time!

One of the things I love most about DIY projects is figuring out how to make something - it's like a giant puzzle. I saw photos of these slotted wall room dividers on Pinterest and just figured it out as I went. All in all, I had very few hiccups and it only took me a few hours to put together. I think I only cursed once?!? And so I call that an extreme DIY win...

Now that the sports wall, the climbing wall, and the built-in feature are complete, the last thing to do in here is some additional painting. I'm thinking of using a contrasting blue color for the closet doors and back side of the built-in, and perhaps trimming out the window with it as well. Then I need to switch out the light for a fan and this.room.is done 🙌

Details: I used two IKEA billy bookshelves, screwed together and secured to the wall. Then wrapped them in white oak plywood. I ripped down 2x4s into 1.5x1.5" square dowels (heavily sanded!) and used pocket holes on the back side of each to secure to the bookshelf and the 1x4 in the ceiling. It's very sturdy!

Go back in my reels to see the other projects from this room! 

#diy #boysroom #roomrenovation #roomrefresh #kidsrooms #climbingwall #soccerbedroom #builtins #bedroomredo #girlswhobuild
This climbing wall took half a day and cost under This climbing wall took half a day and cost under $100!

We are lucky enough to have 13' ceilings in our bedrooms, so a climbing wall seemed to make sense in my son's room as we worked on the remodel.

He is a super active kid with #ADHD, so his room redo has involved lots of activity spaces! Go back in my reels to see past projects and follow to see me finish this up!

#diy #roomrenovation #roomrefresh #kidsrooms #climbingwall #soccerbedroom
Another to-do checked off my list for spring break Another to-do checked off my list for spring break room makeover!

I added very subtle striping to the wall to mimic a soccer field and keep things classy. ⚽

Stick around to see the next project - a climbing wall!

(And go back in my reels to see the sports wall)

#roommakeover #soccer #kidsroom

Popular Posts:

Ikea Hack: DIY Mudroom Benches
Felt Food Patterns (Link Love)
Babyproofing the stair railings with plexiglass
Free printable Father’s Day questionnaires for dad and grandpa

Recent Posts

  • Functional and Stylish Small Entryway Ideas for a Welcoming Space
  • Pendant & Accent Lights Under $100
  • DIY Stenciled Concrete Floors: Laundry Room Update Part 1
  • First Day and Last Day of School Questionnaire (free printables)
  • How to Create Canvas Wall Art from Digital Photos

>> ABOUT ME
>> DISCLOSURE STATEMENT
>> CONTACT ME

Copyright © 2025 themombot.com
Terms of Service // Privacy Policy