A while back, I mentioned that JoAnn Fabrics was now carrying a line for DIY cloth diapers and I was super excited about them. I began cloth diapering with my first child around 3 months, and really wanted to start at birth with baby #2. But since babies only wear newborn diapers for 4-12 weeks (depending on the size of your child), I didn’t want to spend money on purchasing some newborn cloth diapers that would barely get worn. I figured I could save some money if I made my own and thought this might be the answer I was looking for.
Now, I’ve made cloth diaper inserts before (see here) to go with my Flip diaper covers, but I had yet to make my own waterproof covers (I tried in the past and failed miserably). So I planned on making my own inserts using my old pattern (I wasn’t crazy about the patterns and materials suggest in the Babyville book), and newborn-sized covers using the Babyville Boutique patterns.

The DIY Babyville Boutique diaper book comes with instructions, photos, and patterns, and I hoped I could learn how to do it without too much trouble. After trying it out, here’s my honest review:
1. Price
It wasn’t as cost effective as I had hoped. If I had bought everything at full price, I wouldn’t have saved any money versus buying fully made diapers. I used 50% off coupons for pretty much everything I bought, which definitely helped, but unfortunately I still don’t think it was enough of a savings to make it worth it.
To make three diaper covers, here’s what I spent:
- Book of patterns: $5 (coupon price)
- Foldover elastic: $6.99 (didn’t have a coupon)
- 3 -pack of PUL prints: $7.50 (coupon price)
- Packet of snaps: $3.50 (coupon price)
- Snap pliers: $10 (coupon price)
- Total: $33 ($11 per diaper)
This didn’t include fabric glue, which it suggested I buy, but I decided to forego it. The also suggest you buy their cute little labels and appliques, but I wasn’t about to spend more money for cuteness. I bought the snap pliers and snaps versus velcro (which would have been cheaper), because I feel like snaps last longer and I hate the dreaded “diaper chain” when the velcro covers all get stuck together in the wash. Plus, I knew I could use the snap pliers and snaps to make other things (like bibs) in the future.
BUT, I have bought diaper covers on sale for $11 a piece in the past, so I really didn’t save any versus purchasing finished covers… bummer.
2. Instructions
This is the positive portion of the review. This instructions were easy to follow, and I was able to finish a cover in a couple of hours. I had to think through a couple of parts to make it work, but for the most part, it wasn’t too complicated. Babyville did a great job of making it simple to make your own covers.
3. Fit
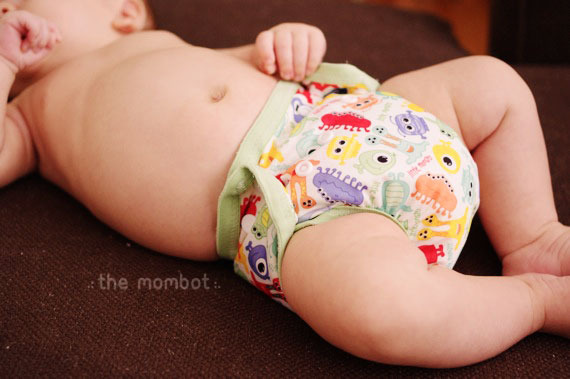
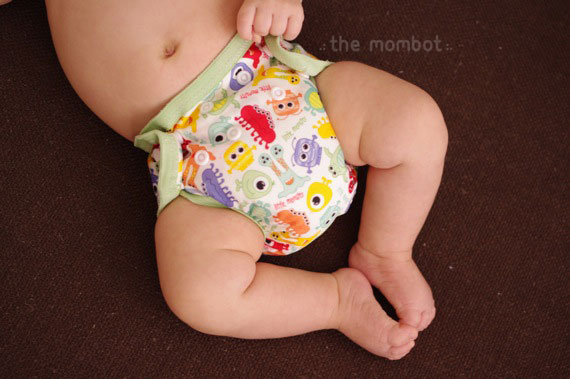
The fit was great – although I had to wait until my son was about 4 weeks before they would fit him around the legs, and by the time they did, he outgrew them in about 2-3 weeks. All that work for so little use… I could have adjusted the fit to make it work, but I was too lazy and sleep deprived to do that. The one thing that bothered me about the fit was that the closure tabs stuck out instead of laying flat. I think this was due to the fact that I used snaps instead of velcro, and because the foldover elastic used on the edges of the tabs thickened them (see photos above for reference).
4. Leakage
Wa, waaaa. I definitely had leakage issues. The first diaper I made was a simple pattern, similar to the Flip one-size diaper covers; all the edges are finished with foldover elastic, which makes sewing it very simple because there are no foldover hems to be done. The diaper fit him snug so nothing escaped, but as soon as he wet himself, the elastic on the legholes got wet and soaked through his clothes. To try and remedy this, on my second diaper cover I added leg gussets, hoping the elastic on the gusset might get wet, but the outer would stay dry. No such luck though… Not only did this diaper end up being too small (the leghole size was severely reduced from the gussets), but the diaper still leaked when my son peed.
There are several different patterns in the Babyville book, and not all of them use the foldover elastic on the legholes (although this is the easiest way to make them, which is why I chose the patterns I did). I think if I had used a pattern with hidden elastic (where the PUL folds over the elastic), I would have had a better result with wetness leaking through. I never ended up making a third diaper cover, but if I ever get around to it, I will probably use a hidden elastic pattern.
5. Quality
I had no issues with the quality of the materials. The snaps worked great (I actually love my snaps and snap pliers, and will definitely be using them in the future on other projects). The PUL fabric has held up well thus far, and I never felt like anything was falling apart on my diaper cover.
Overall Conclusion:
Sure, they’re cute, but not worth the time, effort, and money. And I am sad to say so… I REALLY wanted this to work! As a frugal mom, I am always trying to save where I can, and part of my reasoning for cloth diapering was to save money (although I also do it for the environmental effect). After trying my hardest to make this work, I felt like a bit of a failure and I didn’t have the energy (thanks to my newborn and hyperactive toddler) to keep on trying.
So that’s my honest opinion. Babyville makes another pattern book with other goodies like bibs, burp rags, etc. and I would definitely be willing to try some of those out. But from here on out, I think I’ll be purchasing my cloth diaper covers…
Have you ever made your own covers and succeeded? Please share! I would love to feel like it’s possible and affordable!

