I recently met Jared Wilson when we moved to Colorado and was immediately blown away by his photography skills. The moments he is able to capture on camera are often highlighted by beautiful Colorado scenery and his inspiring creative eye! He ever-so-kindly agreed to write a post for our “Capture the Little Moments” series explaining exactly how to shoot in AV mode, which will get you those beautiful blurry backgrounds. So take your DSLR cameras off auto and follow along to learn a new trick!
Here’s Jared:
I’ve received the same question from numerous photographers with a new camera and a newfound passion for the hobby: “How can I get those nice blurry backgrounds?” The short answer is: AV mode (Canon) or A mode (Nikon).
I’ll try to explain this as best I can – how it works and how to use it – and if it starts going too far over your head, just hang with me and I’ll try to make it even easier!
The A stands for ‘Aperture’ and setting your camera to a high aperture will help you blur out the background. Now, here’s where part of this might get confusing. When we say ‘high’ aperture that’s referring to a ‘small’ number – the smaller the better (and the more blurry)!
To give you an example I looked up the best selling point and shoot cameras on Amazon. The #1 Canon camera is the Powershot A1400. If you look at the front of the lens on the A1400 you’ll see these numbers: 5.0-25.0mm 1:2.8-6.9. The first range of numbers is mm and refers to how wide or how ‘zoomed in’ you can go. The second range of numbers is the range of aperture for this particular camera. 2.8 is the lowest which means that if you can figure out how to get your camera to shoot at this 2.8 aperture then your images will have the blurriest backgrounds that this camera can pull off! (The best selling Nikon is the Coolpix L820 with an aperture range (written on the front of the lens) of 3.0-5.8 Try to get the camera to use the 3.0 aperture!)
To get your camera to use this ‘high’ aperture (the ‘low’ number) you’ll need to look up in your manual how to turn on that setting – sometimes it’s as easy as turning a knob and sometimes you’ll have to select it in a menu somewhere else. Another important thing to note is that if your lens does have a range of aperture numbers written on it, then what that means is that when you are using your camera in wide angle mode you can use that 2.8 or 3.0 aperture but when you zoom in as far as you can go, then the best aperture you’ll be able to achieve is that 6.9 or 5.8 or whatever your particular camera and lens give you. If you want to use a high aperture to get blurry backgrounds with a consumer or prosumer camera, this often times means you have to shoot with a wide angle!
Are you lost yet, or bored? Let me back up and tell you why I believe that AV mode (or A) is the very first step you should take as you try to get away from that dreaded green box (auto) mode.
First of all, it’s the first step I took on my path to becoming a professional photographer. I can still remember the very first wedding I photographed as an assistant to a real pro. When I arrived at the church, they took a look at the lenses I had brought with me – of which the lowest aperture available to me on my best lenses was ‘4.0’. They told me to turn my camera to AV mode (yes, I use Canon), set my camera to 4.0 (with SLR cameras it can be this easy) and that was it! For the rest of the day I received no other instruction from the pro than this. Of course, there’s a lot more to being a pro and taking professional photographs than this, but getting the highest aperture possible is step #1. And it truly is the most important first step you can take!
Why? Well, we already mentioned the blurry backgrounds. The official word for this is ‘bokeh’ and bokeh is beautiful. We all love it; but besides the fact that it’s pretty, there are a couple of other reasons to use it.
1. It isolates your subjects
First, a high aperture can isolate your subjects for a better photograph or portrait. Think of aperture as a way of de-cluttering your photographs. Clutter is distracting! Just look at this portrait I took here:

There were lots of trees and bushes and grass and weeds and dirt in the background, as you can see on the right – but we see none of that in the image on the left. With an aperture of 2.8, all of that turns into a beautifully decluttered soft background of greens and golds. What happens next is that our eyes are immediately drawn to her eyes and there is nothing to distract us from looking straight at her. And THAT is what makes a portrait a good portrait!
2. It lets in more light!
Another special power of using high aperture is that it lets more light into your camera. If you’re taking photographs at night or in a dark room and you’re getting blurry photos (and now I’m talking about that bad kind of blurry – you know what I mean!) you can often times solve this problem, or at least help it significantly, by shooting at the highest aperture you can. This will allow your camera to take photos in dark places by allowing the most light in as possible, thereby reducing that ‘bad’ kind of blur. Of course, as with everything, rules are made to be broken and sometimes playing with these ideas I just gave you can produce some wonderful results

What happens if you DON’T want a blurry background?
Of course, sometimes you’ll WANT all of that background! If you’re taking a photograph of some amazing scenery, the last thing you want is for it to be blurred out – so use the smallest aperture you can (the bigger number) and get all of that scenery in your photo! This one was shot at a very low aperture – maybe even f/16 (most times you’ll see aperture referenced with this: “f/“).

In this portrait of the bride and groom I wanted the mountains in the background. They got married at the Maroon Bells in Aspen so I wanted them to have that scenery on record! I also tried to frame the photo so that the wildflowers in the foreground were in focus as well. I set all of this up knowing that by using a large number I could have the mountains, the couple, and the flowers all a part of the photograph.
Here are a few more examples:

This was taken at a concert at a bar in Denver. You can see the musician bathed in the blue light. You might even notice the heads of some audience members. But what are those glowy blue dots above? Those are the wine glasses hanging above the bar! I went around to the back of the bar for this photo – purposefully attempting to blur out all of those glasses that were lit up by the concert lighting to see what would happen. Sometimes you just gotta get out there and play!

I guess I probably could’ve blurred out the elephant – but why would I want to do that!?
If you have an SLR camera and are contemplating what lens to buy beyond the one that came with your camera, think about getting one with a 1.8 aperture. My very first additional lens was a 50mm f/1.8 by Canon which only costs about $75. When you start taking photos with apertures like 1.8 (or even larger) amazing things can happen:

So, my encouragement to you is – go for it! Turn away from that green auto mode and get on over to Av/A mode – you’ll be so glad you did!
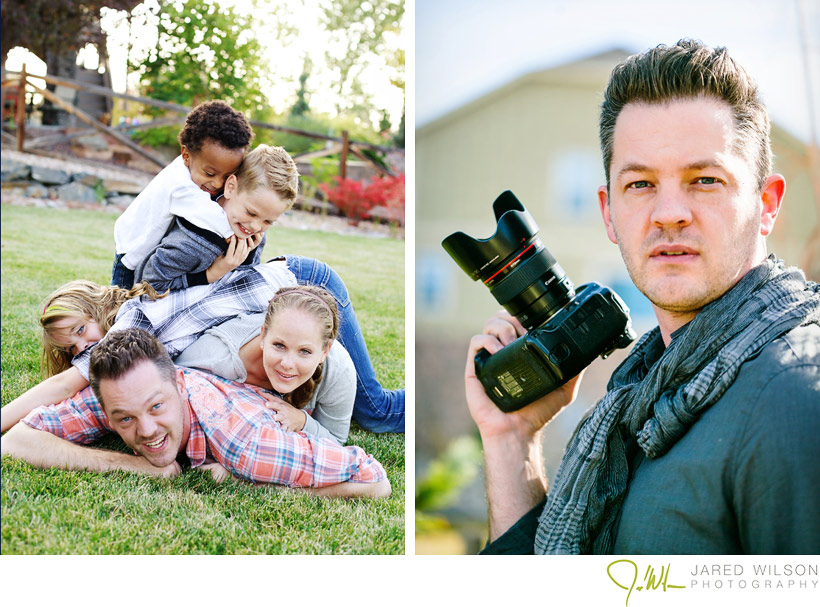
Jared Wilson is a wedding and portrait photographer based in the Denver Metro area. His wedding work can be found at www.jaredwilsonphotography.com and his portrait work can be found at www.jaredwilsonportraits.com Follow him on Facebook