• The Mombot
  • Gift Guides
  • My Story
  • Food & Drink
  • Life
  • Home
  • DIY
  • Mama Style
  • Shop

The Mombot

Motherhood Simplified.

DIY/refurbished kitchen table for the patio

September 20, 2013 | Leave a Comment

When we moved to Colorado, we downsized our backyard from a giant yard and patio with plenty of potential disasters for kids to a small backyard patio about 1/4 the size. It’s completely fenced in and I can see out to it from two large windows in the living room; which means I can send the kids out to play while I get some stuff done inside without having to worry about them. *Pause for a huge sigh of happy relief*

We sold all of our patio furniture when we moved in order to save space in the moving truck (see our old backyard and patio here), so we had to start from scratch when it came to furnishing the new patio. I hadn’t seen our place before we moved in (my husband did the house hunting on his own since it was out-of-state) and wasn’t sure how much room we really had. When we got here, I was so excited about the size and knew that it would fit a small patio table and chairs perfectly.

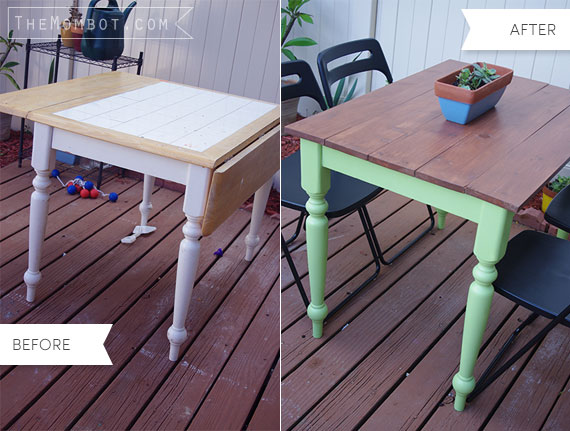
The problem was that patio furniture is SUPER expensive – even for a small table and chairs and even though there were end-of-summer sales happening. So I decided to get creative. I had seen a picture on Pinterest a while back that featured a patio table made from an old kitchen table re-covered with wood planks and I thought – genius! So we headed to the thrift store and found a table that was the perfect size and just happened to be 50% off (score). Thus the process began to transform it.

Here’s a breakdown of the cost of the project:

  • Kitchen table – $18 (thrift store)
  • Spray paint – $3.87 (Color: Green Apple, satin)
  • (2) 10 ft. 1×6″ common boards – $22.96 (Home Depot)
  • (2) 1×2″ poplar precut boards (I don’t recall the length) – $1.89 (Home Depot)
  • Wood stain – $3.68 (Home Depot // Behr with weatherproofing in color “Russet”)
  • Screws – $5.58 (Home Depot)

Here’s the process of transforming the table:

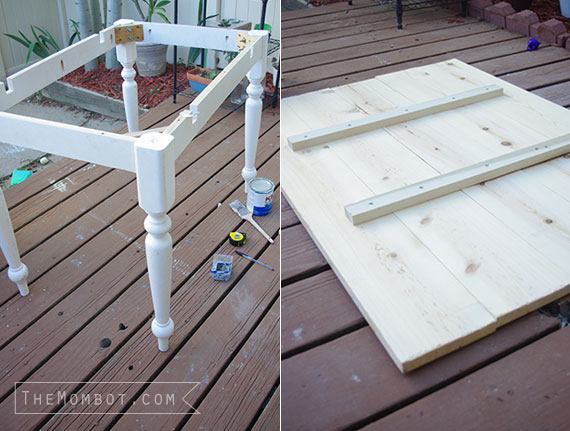
  1. Remove existing tabletop (it was screwed into the base in several spots & very easy to remove)
  2. Lightly sand the white table base, then spray paint it green apple.
  3. Once dry, I put three layers of polyurethane spray on to protect it from the elements since it would be outdoors.
  4. Cut my 1×6″ boards to form a new tabletop that would fit the existing table base with a slight overhang
  5. Cut two braces from the 1×2″ boards that fit the width of the inside of the table base (so I could set the tabletop right inside the existing base)
  6. Screw the 1×6″ boards to the (2) 1×2″ braces, being sure to center them.
  7. Lightly sand the edges of the tabletop
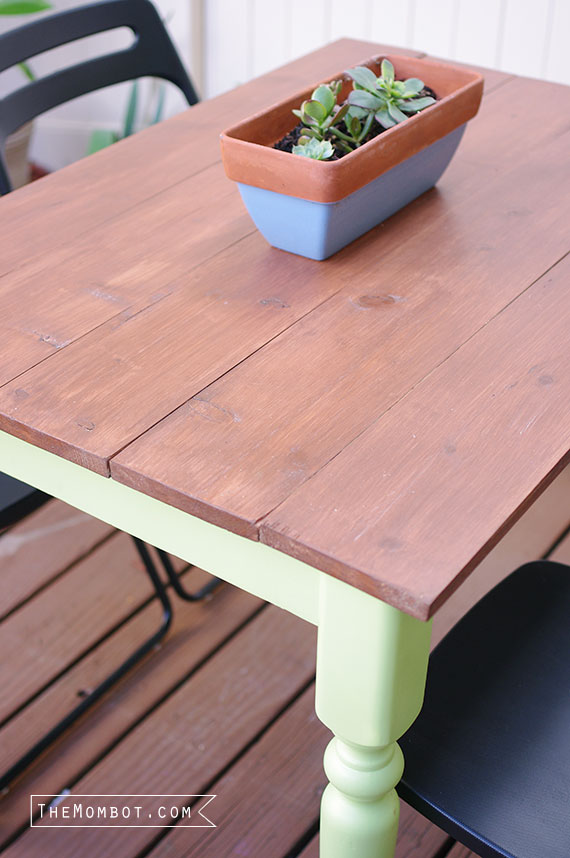
  8. Stain the tabletop
  9. Lay the tabletop face down on the ground and flip the base upside down on top of it. Screw the tabletop into the existing holes on the base, using the same screws that attached the old tabletop.

This was my favorite DIY project to date in the new house because it was super easy and I am totally in love with the result! If not for the drying time with the spray paint and stain, I probably could have completed it in a day.


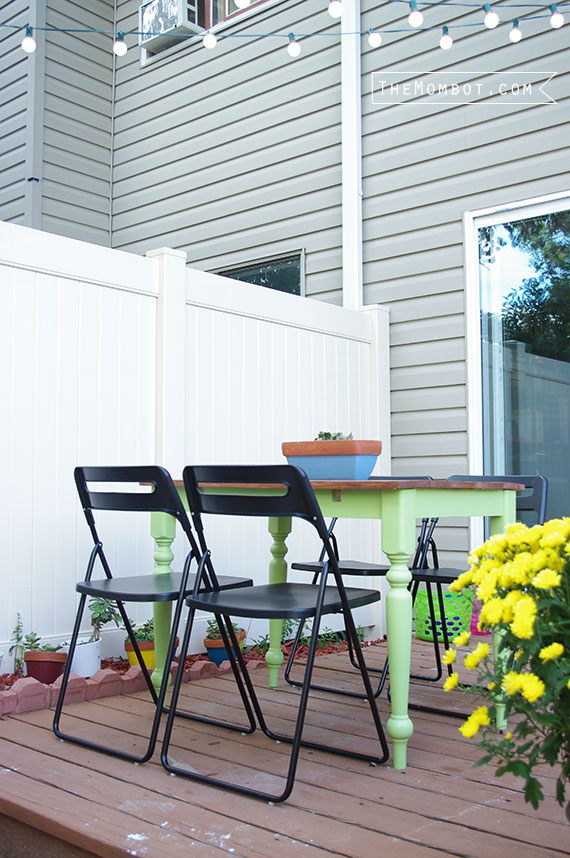
The final touch came from finding chairs – again, super expensive. I knew we needed something small since the table was pretty tiny, and I wanted something that would be easy to store in the winter in our garage. So after checking prices and options all over the place, we eventually went with these folding chairs from Ikea. Price: $12.99 each / $51.96 total.

That brings my “operation: furnish the backyard patio” project to $107.94.

WAY cheaper than any other option I had come across in my browsing. Plus, none of them were quite as cute.

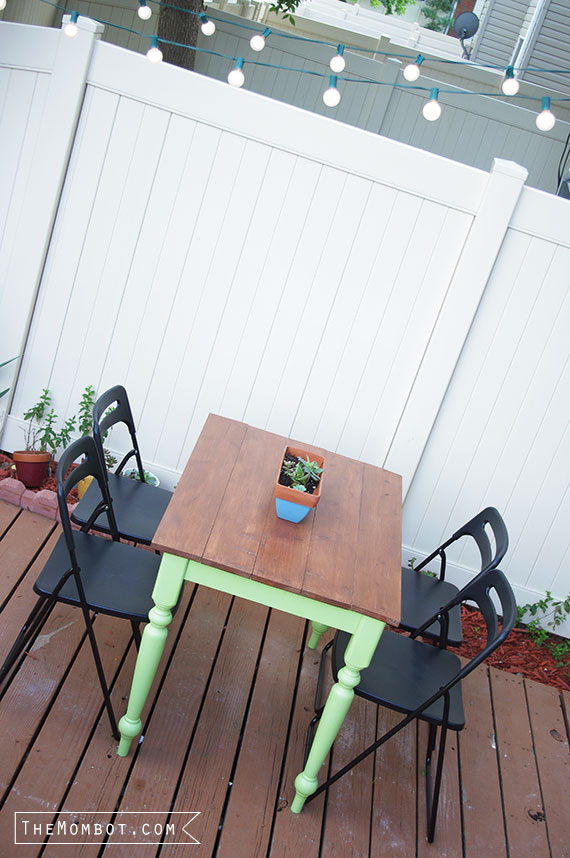
It may be the end of the summer, but we are milking every minute we have left of the warmth by eating lunch and dinner out here as often as possible! By adding some mood lighting (2 light strands from Target, $12 each), the dining space is a little more defined (the other half of the patio has a small Step2 Woodland Climber play unit for the kids. The tree that is behind the table shades it in the morning and the house shades it in the afternoon, so an umbrella really wasn’t necessary, either.

The best part is that It’s small enough that we can store it all (including the table) in our garage for the winter and next summer it will be ready and waiting when the sun reappears.


*Disclosure: Affiliate links used

Related posts:

  1. DIY Summer Wreath & Bunting
  2. DIY factory coffee cart reveal
  3. Awesome DIY projects & what’s coming up
  4. DIY Outdoor Boot Rack

Filed Under: crafting Tagged With: furniture, home, summer

  • Email
  • Facebook
  • Instagram
  • Pinterest
  • RSS
  • Twitter

HI! I'M AMY.

I'M A BLOGGER, GRAPHIC DESIGNER, MOM, COFFEE ADDICT, DIYER, CHRONIC MULTITASKER AND STRESSCASE, A COOK AND A LOVER OF A GOOD GLASS OF WINE.
LEARN MORE ABOUT ME

Shop My Paper Line:

Favorites:

Instagram:

I get it. It's a little weird. But the girls I've I get it. It's a little weird.
But the girls I've seen do it best, look adorable.

I think it looks best with an oversized tee or sweatshirt, tennies or slides, and a small crossbody bag.

You can't argue with comfort.

For the record, these are women's sleep shorts that I've had a couple of years from Old Navy. If you buy actual men's boxers, you might consider sewing up the pee pocket 😜

Don't spend a lot on this trend; these shorts are made from the thinnest of fabric and shouldn't cost much. Don't be fooled by a retailer that wants you to spend just because it's trendy.

But if you see some cute boxers and want to give it a go - then do! Bonus - if/when the trend ends, you'll have pajamas on the ready 👏

It's solid weekend wear, but I'm not going out to dinner in it...

#boxershortsforgirls #boxershort #ootd #womensfashion #styleinspiration
Another project down in my son's room! I knew I w Another project down in my son's room!

I knew I wanted some sort of built-in feature in this bedroom, but it was hard to figure out what, because we turned it into an active space where he could run and play and needed a lot of room.

So I settled on a built-in bookcase with the slatted design feature, which I'm in love with!

The best part about it is that if he ever decides to upgrade his bed, the space will also accommodate a full or queen size bed going in the opposite direction. It adds so much interest to this room and hopefully will be here for a long time!

One of the things I love most about DIY projects is figuring out how to make something - it's like a giant puzzle. I saw photos of these slotted wall room dividers on Pinterest and just figured it out as I went. All in all, I had very few hiccups and it only took me a few hours to put together. I think I only cursed once?!? And so I call that an extreme DIY win...

Now that the sports wall, the climbing wall, and the built-in feature are complete, the last thing to do in here is some additional painting. I'm thinking of using a contrasting blue color for the closet doors and back side of the built-in, and perhaps trimming out the window with it as well. Then I need to switch out the light for a fan and this.room.is done 🙌

Details: I used two IKEA billy bookshelves, screwed together and secured to the wall. Then wrapped them in white oak plywood. I ripped down 2x4s into 1.5x1.5" square dowels (heavily sanded!) and used pocket holes on the back side of each to secure to the bookshelf and the 1x4 in the ceiling. It's very sturdy!

Go back in my reels to see the other projects from this room! 

#diy #boysroom #roomrenovation #roomrefresh #kidsrooms #climbingwall #soccerbedroom #builtins #bedroomredo #girlswhobuild
This climbing wall took half a day and cost under This climbing wall took half a day and cost under $100!

We are lucky enough to have 13' ceilings in our bedrooms, so a climbing wall seemed to make sense in my son's room as we worked on the remodel.

He is a super active kid with #ADHD, so his room redo has involved lots of activity spaces! Go back in my reels to see past projects and follow to see me finish this up!

#diy #roomrenovation #roomrefresh #kidsrooms #climbingwall #soccerbedroom
Another to-do checked off my list for spring break Another to-do checked off my list for spring break room makeover!

I added very subtle striping to the wall to mimic a soccer field and keep things classy. ⚽

Stick around to see the next project - a climbing wall!

(And go back in my reels to see the sports wall)

#roommakeover #soccer #kidsroom

Popular Posts:

Ikea Hack: DIY Mudroom Benches
Babyproofing the stair railings with plexiglass
Felt Food Patterns (Link Love)
DIY Outdoor Boot Rack

Recent Posts

  • Functional and Stylish Small Entryway Ideas for a Welcoming Space
  • Pendant & Accent Lights Under $100
  • DIY Stenciled Concrete Floors: Laundry Room Update Part 1
  • First Day and Last Day of School Questionnaire (free printables)
  • How to Create Canvas Wall Art from Digital Photos

>> ABOUT ME
>> DISCLOSURE STATEMENT
>> CONTACT ME

Copyright © 2025 themombot.com
Terms of Service // Privacy Policy