• The Mombot
  • Gift Guides
  • My Story
  • Food & Drink
  • Life
  • Home
  • DIY
  • Mama Style
  • Shop

The Mombot

Motherhood Simplified.

Tips for photographing pumpkin carving (and other fun events)

October 29, 2012 | Leave a Comment

I’m still working on how best to document yearly events – like pumpkin carving – through photography. I like to make sure I capture the entirety of the event, taking pictures throughout. I tend to take less artsy photos of the details and focus more on my kids, and I think that’s ok.

Here are some photos I took of our adventure pumpkin carving (mostly pumpkin painting, since I have a toddler and carving is too much work) and some tips for photographing your own similar events.

Tips for Photographing Pumpkin Carving


Don’t forget to photograph the journey!

Here my daughter is pulling our pumpkins to a neighbor’s house so we can prepare to carve. Capturing her excitement for the event made for a great photograph.

How to photography pumpkin carving, Photography tips on TheMombot.com


Try different angles.

Photographing head-on allowed me to get this cute smile on camera, but sneaking behind her allowed me to get a photo of her painting skills.

How to photography pumpkin carving, Photography tips on TheMombot.com


Find your best lighting.

After we painted our pumpkins, I wanted a work-in-progress photo (they had to dry before I peeled off the stickers beneath the painting, revealing the design). The first photo I took revealed that the sun was shining on the back of my pumpkin, which cast an ugly shadow and gave me poor lighting on the front of the pumpkin. Turning my pumpkins to around to face the sun cleared things up a bit and resulted in a much better photo.

How to photography pumpkin carving, Photography tips on TheMombot.com


Photographing your pumpkins at night.

Low-lighting can be hard to photograph. These photos turn out best when you don’t have the flash on and allow the light from the pumpkin to be your only lighting in the photo.

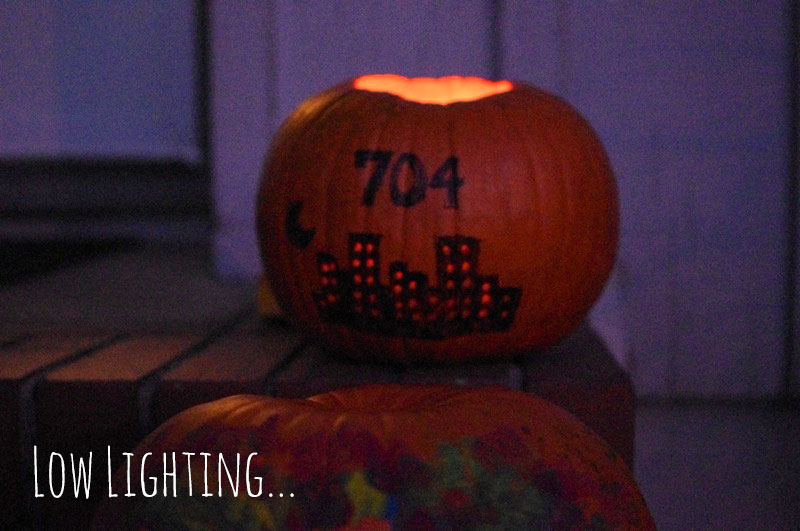
To achieve this with an SLR camera, turn your ISO way down (I set mine to 6400, as low as it goes). Put your camera on Aperture Priority (Av on the dial) and set it as low as it goes, I suggest around F3.2 or F4.0, although mine was all the way down to F2.8. The lower your aperture, the more light you let into your camera. Your shutter speed will automatically adjust on this setting (shutter speed = how long it takes for your camera to โ€œclickโ€ and take the picture). If your photo is too bright and the pumpkins don’t look lit up enough, you can close down your aperture (meaning pick a bigger number) or lower your ISO setting. If you don’t wait until it’s pitch black outside, you’ll probably get a better photo. It was really dark when I took mine.

And, of course, be sure you snap a picture of the finished product!

How to photography pumpkin carving, Photography tips on TheMombot.com


If you’re looking for more tips on photography and using your SLR camera, check out Mom and Pop photo school – they’ll send beginner tutorials and lessons right to your inbox so you can learn on your time.

mom and pop photo classes

*Disclosure: Affiliate links used

Related posts:

  1. How to photograph 4th of July fireworks
  2. Magnetic photo strip display
  3. DIY toddler cowgirl costume
  4. Point-and-shoot photography tips for beginners

Filed Under: crafting Tagged With: Halloween, how to, photography, pumpkins

  • Email
  • Facebook
  • Instagram
  • Pinterest
  • RSS
  • Twitter

HI! I'M AMY.

I'M A BLOGGER, GRAPHIC DESIGNER, MOM, COFFEE ADDICT, DIYER, CHRONIC MULTITASKER AND STRESSCASE, A COOK AND A LOVER OF A GOOD GLASS OF WINE.
LEARN MORE ABOUT ME

Shop My Paper Line:

Favorites:

Instagram:

I get it. It's a little weird. But the girls I've I get it. It's a little weird.
But the girls I've seen do it best, look adorable.

I think it looks best with an oversized tee or sweatshirt, tennies or slides, and a small crossbody bag.

You can't argue with comfort.

For the record, these are women's sleep shorts that I've had a couple of years from Old Navy. If you buy actual men's boxers, you might consider sewing up the pee pocket ๐Ÿ˜œ

Don't spend a lot on this trend; these shorts are made from the thinnest of fabric and shouldn't cost much. Don't be fooled by a retailer that wants you to spend just because it's trendy.

But if you see some cute boxers and want to give it a go - then do! Bonus - if/when the trend ends, you'll have pajamas on the ready ๐Ÿ‘

It's solid weekend wear, but I'm not going out to dinner in it...

#boxershortsforgirls #boxershort #ootd #womensfashion #styleinspiration
Another project down in my son's room! I knew I w Another project down in my son's room!

I knew I wanted some sort of built-in feature in this bedroom, but it was hard to figure out what, because we turned it into an active space where he could run and play and needed a lot of room.

So I settled on a built-in bookcase with the slatted design feature, which I'm in love with!

The best part about it is that if he ever decides to upgrade his bed, the space will also accommodate a full or queen size bed going in the opposite direction. It adds so much interest to this room and hopefully will be here for a long time!

One of the things I love most about DIY projects is figuring out how to make something - it's like a giant puzzle. I saw photos of these slotted wall room dividers on Pinterest and just figured it out as I went. All in all, I had very few hiccups and it only took me a few hours to put together. I think I only cursed once?!? And so I call that an extreme DIY win...

Now that the sports wall, the climbing wall, and the built-in feature are complete, the last thing to do in here is some additional painting. I'm thinking of using a contrasting blue color for the closet doors and back side of the built-in, and perhaps trimming out the window with it as well. Then I need to switch out the light for a fan and this.room.is done ๐Ÿ™Œ

Details: I used two IKEA billy bookshelves, screwed together and secured to the wall. Then wrapped them in white oak plywood. I ripped down 2x4s into 1.5x1.5" square dowels (heavily sanded!) and used pocket holes on the back side of each to secure to the bookshelf and the 1x4 in the ceiling. It's very sturdy!

Go back in my reels to see the other projects from this room! 

#diy #boysroom #roomrenovation #roomrefresh #kidsrooms #climbingwall #soccerbedroom #builtins #bedroomredo #girlswhobuild
This climbing wall took half a day and cost under This climbing wall took half a day and cost under $100!

We are lucky enough to have 13' ceilings in our bedrooms, so a climbing wall seemed to make sense in my son's room as we worked on the remodel.

He is a super active kid with #ADHD, so his room redo has involved lots of activity spaces! Go back in my reels to see past projects and follow to see me finish this up!

#diy #roomrenovation #roomrefresh #kidsrooms #climbingwall #soccerbedroom
Another to-do checked off my list for spring break Another to-do checked off my list for spring break room makeover!

I added very subtle striping to the wall to mimic a soccer field and keep things classy. โšฝ

Stick around to see the next project - a climbing wall!

(And go back in my reels to see the sports wall)

#roommakeover #soccer #kidsroom

Popular Posts:

Ikea Hack: DIY Mudroom Benches
Babyproofing the stair railings with plexiglass
Felt Food Patterns (Link Love)
DIY Outdoor Boot Rack

Recent Posts

  • Functional and Stylish Small Entryway Ideas for a Welcoming Space
  • Pendant & Accent Lights Under $100
  • DIY Stenciled Concrete Floors: Laundry Room Update Part 1
  • First Day and Last Day of School Questionnaire (free printables)
  • How to Create Canvas Wall Art from Digital Photos

>> ABOUT ME
>> DISCLOSURE STATEMENT
>> CONTACT ME

Copyright © 2025 themombot.com
Terms of Service // Privacy Policy