• The Mombot
  • Gift Guides
  • My Story
  • Food & Drink
  • Life
  • Home
  • DIY
  • Mama Style
  • Shop

The Mombot

Motherhood Simplified.

DIY diaper pail liner

August 15, 2011 | Leave a Comment

When I had my daughter and decided to use cloth diapers, I knew I also wanted to make a reusable pail liner instead of using trash bags (both to save money and to be more “green”). Most pail liners retail for anywhere from $15-30 online, but I knew I could make one cheaper by purchasing PUL (polyurethane laminate) at Jo-Ann Fabrics – especially if I used a coupon.

I have discussed PUL before, but as a refresher, it is a polyester interlock knit fabric that has been laminated to a thin film of polyurethane. This polyurethane is water-resistant, breathable, and can be machine-washed and dried; making it ideal for cloth diaper covers and pail liners.

After a trip to Jo-Ann’s for supplies, I purchased PUL for $2.50 (1 yard at $4.99/yd, with 50% off coupon) and elastic for $1.50, which brought my pail liner to a total of $4.

Whether you use cloth diapers or disposables, this is a simple way to save money on trash bags. It easily pulls out of the pail and is sturdy enough to carry your diapers to the trash bin or wash machine.

Here’s a simple tutorial on how to make a reusable diaper pail liner:

Materials:

  • 1 yard PUL (polyurethane laminate)
  • 3/8” elastic cut to a length that fits the rim of your diaper pail (mine was 32” for a Safety First Easy Saver diaper pail)

Directions:

1. Cut PUL to 22” wide, 48” long

2. Fold in half bringing together the 22” ends with the laminated sides together (you will now have a 22” x 24” rectangle). Pin sides together, or use hair clips or paper clips to keep in place (holes poked through laminate will not disappear, so if you are worried about pin marks, use hair clips as illustrated here).

diy diaper pail liner, reusable pail liner, diaper pail liner how to

Sew along 24” sides using a quality poly thread and reinforced stitching if you have it. I used a straight stretch stitch that works well for stretch fabrics (#18 on image below). I have made these liners before with regular stitching and cheap thread, and the seams have broken over time and had to be repaired.

diy diaper pail liner, reusable pail liner, diaper pail liner how to

3. Fold your top edge over 1/4” & then another 6/8” & pin/clip in place.

diy diaper pail liner, reusable pail liner, diaper pail liner how to

4. Before you sew along your PUL, you should familiarize yourself with how PUL works in the sewing machine. Because of the laminate, the PUL tends to stick to your foot, which can pucker your seams. To get around this, I use a walking foot, which has a feed dog incorporated into the actual foot and helps move the fabric along. You could also use an Ultraglide or Teflon foot (which has a special coating specifically for PUL and vinyl), or you could or sew on top of wax paper. More info here.

Now, sew a seam close to the edge, removing pins/hair clips as you go. Leave a 1” opening where you will thread your elastic.

diy diaper pail liner, reusable pail liner, diaper pail liner how to

5. Thread your elastic through your opening. I usually put a safety pin through one end of my elastic, which makes it easy to thread. Sew both ends of your elastic together a couple of times for a strong seam.

diy diaper pail liner, reusable pail liner, diaper pail liner how to

6. Sew the opening closed.

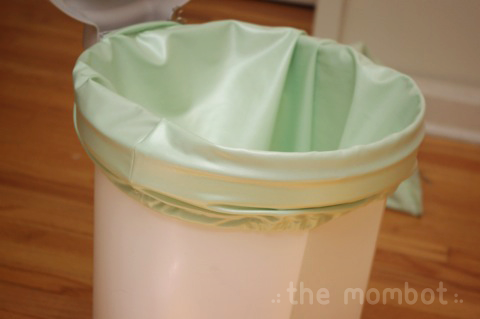
7. Place your liner inside your pail (the laminate should be on the inside of your liner; you want the waterproof part touching the diapers) and fold over the edge to secure in place.

diy diaper pail liner, reusable pail liner, diaper pail liner how to

Link Parties:

  • Home Savvy A to Z
  • C.R.A.F.T.
  • CraftOManiac
  • Hope Studios
  • Tip Junkie
  • All Thingz Related
  • We Are That Family
  • Gingersnap Crafts
  • Lil Luna
  • Saved By Love Creations
  • I Heart Naptime

Related posts:

  1. Adorable DIY cloth diapers now sold at JoAnn’s
  2. Tutorial: Car caddy for boys
  3. Turn a purse into a camera bag
  4. Babyville Boutique DIY diaper review

Filed Under: crafting, going green Tagged With: cloth diapering, how-to, sewing

  • Email
  • Facebook
  • Instagram
  • Pinterest
  • RSS
  • Twitter

HI! I'M AMY.

I'M A BLOGGER, GRAPHIC DESIGNER, MOM, COFFEE ADDICT, DIYER, CHRONIC MULTITASKER AND STRESSCASE, A COOK AND A LOVER OF A GOOD GLASS OF WINE.
LEARN MORE ABOUT ME

Shop My Paper Line:

Favorites:

Instagram:

I get it. It's a little weird. But the girls I've I get it. It's a little weird.
But the girls I've seen do it best, look adorable.

I think it looks best with an oversized tee or sweatshirt, tennies or slides, and a small crossbody bag.

You can't argue with comfort.

For the record, these are women's sleep shorts that I've had a couple of years from Old Navy. If you buy actual men's boxers, you might consider sewing up the pee pocket 😜

Don't spend a lot on this trend; these shorts are made from the thinnest of fabric and shouldn't cost much. Don't be fooled by a retailer that wants you to spend just because it's trendy.

But if you see some cute boxers and want to give it a go - then do! Bonus - if/when the trend ends, you'll have pajamas on the ready 👏

It's solid weekend wear, but I'm not going out to dinner in it...

#boxershortsforgirls #boxershort #ootd #womensfashion #styleinspiration
Another project down in my son's room! I knew I w Another project down in my son's room!

I knew I wanted some sort of built-in feature in this bedroom, but it was hard to figure out what, because we turned it into an active space where he could run and play and needed a lot of room.

So I settled on a built-in bookcase with the slatted design feature, which I'm in love with!

The best part about it is that if he ever decides to upgrade his bed, the space will also accommodate a full or queen size bed going in the opposite direction. It adds so much interest to this room and hopefully will be here for a long time!

One of the things I love most about DIY projects is figuring out how to make something - it's like a giant puzzle. I saw photos of these slotted wall room dividers on Pinterest and just figured it out as I went. All in all, I had very few hiccups and it only took me a few hours to put together. I think I only cursed once?!? And so I call that an extreme DIY win...

Now that the sports wall, the climbing wall, and the built-in feature are complete, the last thing to do in here is some additional painting. I'm thinking of using a contrasting blue color for the closet doors and back side of the built-in, and perhaps trimming out the window with it as well. Then I need to switch out the light for a fan and this.room.is done 🙌

Details: I used two IKEA billy bookshelves, screwed together and secured to the wall. Then wrapped them in white oak plywood. I ripped down 2x4s into 1.5x1.5" square dowels (heavily sanded!) and used pocket holes on the back side of each to secure to the bookshelf and the 1x4 in the ceiling. It's very sturdy!

Go back in my reels to see the other projects from this room! 

#diy #boysroom #roomrenovation #roomrefresh #kidsrooms #climbingwall #soccerbedroom #builtins #bedroomredo #girlswhobuild
This climbing wall took half a day and cost under This climbing wall took half a day and cost under $100!

We are lucky enough to have 13' ceilings in our bedrooms, so a climbing wall seemed to make sense in my son's room as we worked on the remodel.

He is a super active kid with #ADHD, so his room redo has involved lots of activity spaces! Go back in my reels to see past projects and follow to see me finish this up!

#diy #roomrenovation #roomrefresh #kidsrooms #climbingwall #soccerbedroom
Another to-do checked off my list for spring break Another to-do checked off my list for spring break room makeover!

I added very subtle striping to the wall to mimic a soccer field and keep things classy. ⚽

Stick around to see the next project - a climbing wall!

(And go back in my reels to see the sports wall)

#roommakeover #soccer #kidsroom

Popular Posts:

Ikea Hack: DIY Mudroom Benches
Babyproofing the stair railings with plexiglass
Felt Food Patterns (Link Love)
DIY Outdoor Boot Rack

Recent Posts

  • Functional and Stylish Small Entryway Ideas for a Welcoming Space
  • Pendant & Accent Lights Under $100
  • DIY Stenciled Concrete Floors: Laundry Room Update Part 1
  • First Day and Last Day of School Questionnaire (free printables)
  • How to Create Canvas Wall Art from Digital Photos

>> ABOUT ME
>> DISCLOSURE STATEMENT
>> CONTACT ME

Copyright © 2025 themombot.com
Terms of Service // Privacy Policy