• The Mombot
  • Gift Guides
  • My Story
  • Food & Drink
  • Life
  • Home
  • DIY
  • Mama Style
  • Shop

The Mombot

Motherhood Simplified.

DIY reclaimed wood clipboard display

January 5, 2015 | 1 Comment

DIY reclaimed wood clipboard | TheMombot.com

Until we moved to Colorado a year and a half ago, I had never had a fireplace, therefore I’d never had a mantle. When we got here, I was like, “What the heck am I supposed to put up there?” Which, naturally, led to hours of trolling Pinterest for mantle displays (because there are, like, a bajillion mantle pins).

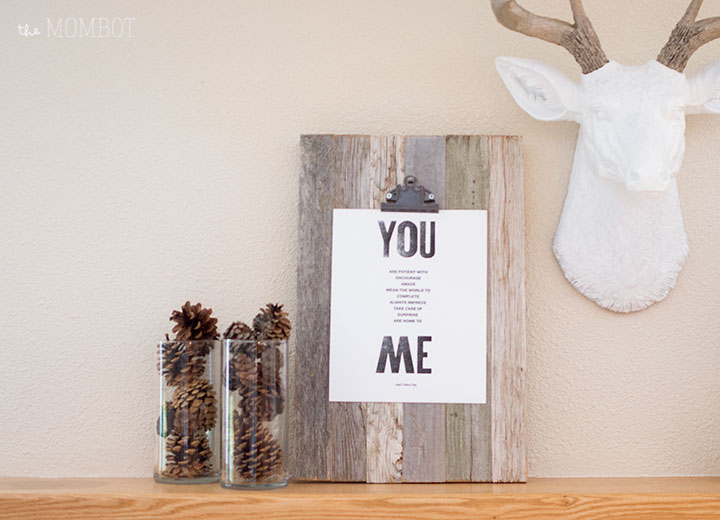
Now I love decorating my mantle for each passing holiday, much like the rest of the Pinterest addicts. I like to change out seasonal artwork, but don’t always have frames handy. Plus, ever since I hung Ruby (our little DIY antler friend), things have gotten a bit more rustic up there and I wanted something to complement her.

So I decided to create a clipboard display made from reclaimed wood; something that would allow me to easily change out artwork whenever I felt the need.

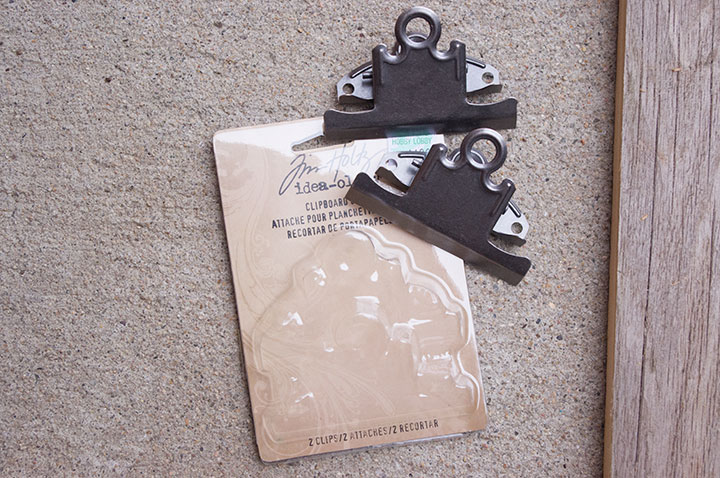
Hobby Lobby usually serves all my DIY needs, and this time was no exception. I picked up a pack of reclaimed wooden boards that I’d been eyeing (but hadn’t yet pulled the trigger on because I couldn’t figure out what to do with them) for $7 (plus I used a 40% of coupon, so they were crazy cheap). I also picked up some clipboard hardware for $4.99.

DIY reclaimed wood clipboard | TheMombot.com

DIY reclaimed wood clipboard | TheMombot.com

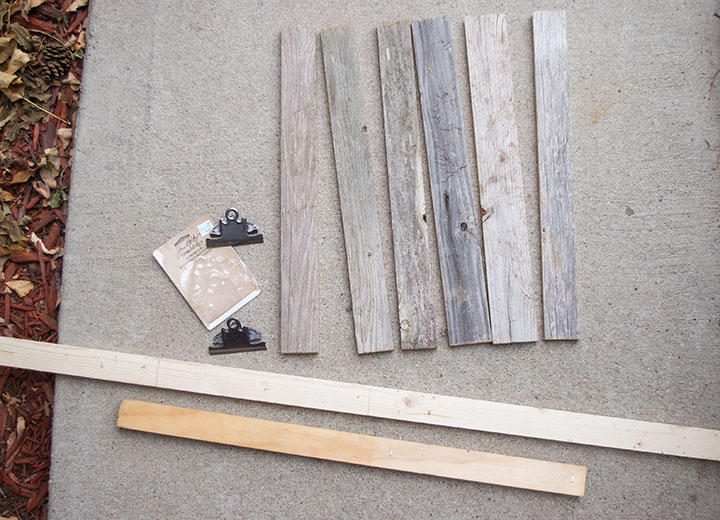
This project was so easy (although I guess I shouldn’t speak for my husband since he did all the work…). We used some leftover 1x2s that we had in the garage and cut them a little shorter than the width of all the boards when they were laid next to each other. He cut 2 boards, one for the top of the display and one for the bottom. Then he simply used 1 1/4” screws to secure the 1x2s to the wooden boards so that they would form one solid display piece.

DIY reclaimed wood clipboard | TheMombot.com

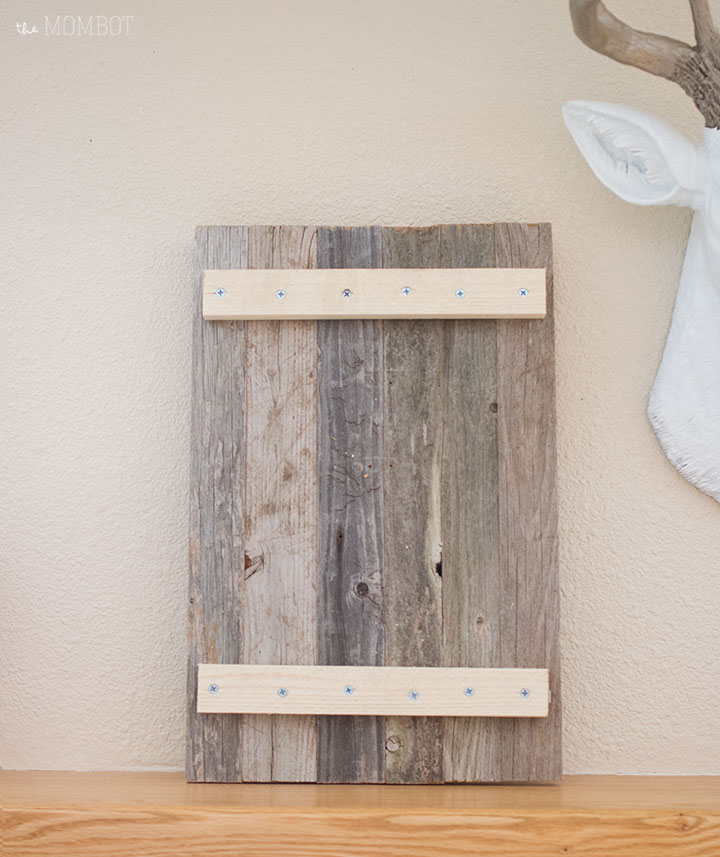
All that was left was to screw in the clipboard hardware. I placed it up high enough so that when I clipped an 8×10” print on the board, it would be centered vertically. P.S. I didn’t need to trim the reclaimed wood boards down at all because they were just the right height for what I wanted, but you could definitely trim your boards to size if need be before you begin the project.

The project can end here, or you can add another 1×2 with a hinge to the back side of the display so that you can give your display a little kick-stand, allowing it to stand up on its own. I did this initially because I used two of these displays at a pop-up show and they had to stand on their own on the table. But when I was finished with the show, I removed the kickstand from one, knowing that I would be leaning it up against the wall on my mantle.

clipboards-art-show

I love the finished product! It’s the perfect little rustic display for my mantle and gives some visual height to what I’ve got going on as well.

Related posts:

  1. DIY indoor hanging tent
  2. “Happiness” wooden block art DIY
  3. DIY children’s watercolor art (for a rainy day)
  4. DIY baby gates from a door (learn from my mistakes)

Filed Under: crafting Tagged With: art, DIY, home

  • Email
  • Facebook
  • Instagram
  • Pinterest
  • RSS
  • Twitter

HI! I'M AMY.

I'M A BLOGGER, GRAPHIC DESIGNER, MOM, COFFEE ADDICT, DIYER, CHRONIC MULTITASKER AND STRESSCASE, A COOK AND A LOVER OF A GOOD GLASS OF WINE.
LEARN MORE ABOUT ME

Shop My Paper Line:

Favorites:

Instagram:

I get it. It's a little weird. But the girls I've I get it. It's a little weird.
But the girls I've seen do it best, look adorable.

I think it looks best with an oversized tee or sweatshirt, tennies or slides, and a small crossbody bag.

You can't argue with comfort.

For the record, these are women's sleep shorts that I've had a couple of years from Old Navy. If you buy actual men's boxers, you might consider sewing up the pee pocket 😜

Don't spend a lot on this trend; these shorts are made from the thinnest of fabric and shouldn't cost much. Don't be fooled by a retailer that wants you to spend just because it's trendy.

But if you see some cute boxers and want to give it a go - then do! Bonus - if/when the trend ends, you'll have pajamas on the ready 👏

It's solid weekend wear, but I'm not going out to dinner in it...

#boxershortsforgirls #boxershort #ootd #womensfashion #styleinspiration
Another project down in my son's room! I knew I w Another project down in my son's room!

I knew I wanted some sort of built-in feature in this bedroom, but it was hard to figure out what, because we turned it into an active space where he could run and play and needed a lot of room.

So I settled on a built-in bookcase with the slatted design feature, which I'm in love with!

The best part about it is that if he ever decides to upgrade his bed, the space will also accommodate a full or queen size bed going in the opposite direction. It adds so much interest to this room and hopefully will be here for a long time!

One of the things I love most about DIY projects is figuring out how to make something - it's like a giant puzzle. I saw photos of these slotted wall room dividers on Pinterest and just figured it out as I went. All in all, I had very few hiccups and it only took me a few hours to put together. I think I only cursed once?!? And so I call that an extreme DIY win...

Now that the sports wall, the climbing wall, and the built-in feature are complete, the last thing to do in here is some additional painting. I'm thinking of using a contrasting blue color for the closet doors and back side of the built-in, and perhaps trimming out the window with it as well. Then I need to switch out the light for a fan and this.room.is done 🙌

Details: I used two IKEA billy bookshelves, screwed together and secured to the wall. Then wrapped them in white oak plywood. I ripped down 2x4s into 1.5x1.5" square dowels (heavily sanded!) and used pocket holes on the back side of each to secure to the bookshelf and the 1x4 in the ceiling. It's very sturdy!

Go back in my reels to see the other projects from this room! 

#diy #boysroom #roomrenovation #roomrefresh #kidsrooms #climbingwall #soccerbedroom #builtins #bedroomredo #girlswhobuild
This climbing wall took half a day and cost under This climbing wall took half a day and cost under $100!

We are lucky enough to have 13' ceilings in our bedrooms, so a climbing wall seemed to make sense in my son's room as we worked on the remodel.

He is a super active kid with #ADHD, so his room redo has involved lots of activity spaces! Go back in my reels to see past projects and follow to see me finish this up!

#diy #roomrenovation #roomrefresh #kidsrooms #climbingwall #soccerbedroom
Another to-do checked off my list for spring break Another to-do checked off my list for spring break room makeover!

I added very subtle striping to the wall to mimic a soccer field and keep things classy. ⚽

Stick around to see the next project - a climbing wall!

(And go back in my reels to see the sports wall)

#roommakeover #soccer #kidsroom

Popular Posts:

Ikea Hack: DIY Mudroom Benches
Babyproofing the stair railings with plexiglass
Felt Food Patterns (Link Love)
DIY Outdoor Boot Rack

Recent Posts

  • Functional and Stylish Small Entryway Ideas for a Welcoming Space
  • Pendant & Accent Lights Under $100
  • DIY Stenciled Concrete Floors: Laundry Room Update Part 1
  • First Day and Last Day of School Questionnaire (free printables)
  • How to Create Canvas Wall Art from Digital Photos

>> ABOUT ME
>> DISCLOSURE STATEMENT
>> CONTACT ME

Copyright © 2025 themombot.com
Terms of Service // Privacy Policy