• The Mombot
  • Gift Guides
  • My Story
  • Food & Drink
  • Life
  • Home
  • DIY
  • Mama Style
  • Shop

The Mombot

Motherhood Simplified.

Stylish staircase babyproofing: An update

August 15, 2014 | 5 Comments

Stylishly babyproofing your staircase and railings | TheMombot.com
cushioned hand rails  |  DIY half-door baby gate

You might remember a while back when I shared some stylish ways to babyproof your house and, more specifically, your stair railings. That’s what led me to create a railing guard from poster-sized sheets of plexiglass that I purchased at Hobby Lobby for $6 each, some frosted glass spray and some clear zip ties.

babyproofing staircase with plexiglass | themombot.com

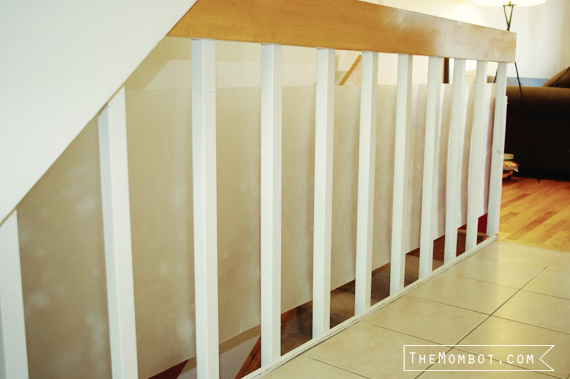
The project was mostly successful, functional but a bit of a bust visually. The frosted glass spray turned out rather blotchy on the plexiglass and within about 6 months of hanging them, we had 3 cracks in various spots on the plexiglass. It wasn’t quite thick enough to withstand my running, bouncing, hyper kiddos. However, no one fell through the railings, so I guess that’s a bonus…

After walking past the cracks that I had covered with packing tape to prolong their life (quit judging me), I decided it was finally time to switch out the plexiglass and come up with something newer and better. That’s when I realized, hey, couldn’t I just use wood? Of course, it would have to be lightweight so that it could be held by zip ties (our railings are made of metal so we can’t drill into them), but it seemed totally doable and a lot sturdier.

I planned on purchasing some masonite board, knowing it was lightweight and came in big sheets. When I got to Home Depot I realized that they also had sheets of MDF board and they were lighter in weight and only $3 a piece – bingo!

Stylishly babyproofing your staircase and railings | TheMombot.com

I purchased 3 of them, along with some paint and some new zip ties (you can buy these in different strengths; mine are made to hold up to 75 lbs).

Although no light can pass through these boards like it could with the plexiglass (one of the reasons I loved this idea so much), I was able to paint them and add a little more color to our walkway. We used the same method to hang them: cut boards to size, drill holes in corners, string zip ties through the holes and tighten around railings. We also cut the last couple of boards to fit the upper staircase angle.

It probably took my husband and I about 45 minutes to hang the boards and we didn’t even fight because the process was easy (bonus). It is much sturdier than our original plexiglass solution and I like the added color to the staircase! I also feel a little more secure knowing the kids can’t punch through it, and it’s nice knowing we probably won’t have to replace it anytime soon.

Stylishly babyproofing your staircase and railings | TheMombot.com

All in all, it was a successful upgrade and an excellent lesson learned.


Related posts:

  1. Baby boy nursery
  2. Stylishly babyproofing your stairs and home
  3. DIY baby gates from a door (learn from my mistakes)
  4. Babyproofing the stair railings with plexiglass

Filed Under: crafting Tagged With: baby, home

  • Pingback: DIY Ways To Make Your Home Safe For Kids – Kosip()

  • Pingback: 10 Smart Ways To Childproof Your Home - Top Dreamer()

  • Pingback: DIY Ways To Baby Proof Your Home – Maids in A Minute()

  • Email
  • Facebook
  • Instagram
  • Pinterest
  • RSS
  • Twitter

HI! I'M AMY.

I'M A BLOGGER, GRAPHIC DESIGNER, MOM, COFFEE ADDICT, DIYER, CHRONIC MULTITASKER AND STRESSCASE, A COOK AND A LOVER OF A GOOD GLASS OF WINE.
LEARN MORE ABOUT ME

Shop My Paper Line:

Favorites:

Instagram:

I get it. It's a little weird. But the girls I've I get it. It's a little weird.
But the girls I've seen do it best, look adorable.

I think it looks best with an oversized tee or sweatshirt, tennies or slides, and a small crossbody bag.

You can't argue with comfort.

For the record, these are women's sleep shorts that I've had a couple of years from Old Navy. If you buy actual men's boxers, you might consider sewing up the pee pocket 😜

Don't spend a lot on this trend; these shorts are made from the thinnest of fabric and shouldn't cost much. Don't be fooled by a retailer that wants you to spend just because it's trendy.

But if you see some cute boxers and want to give it a go - then do! Bonus - if/when the trend ends, you'll have pajamas on the ready 👏

It's solid weekend wear, but I'm not going out to dinner in it...

#boxershortsforgirls #boxershort #ootd #womensfashion #styleinspiration
Another project down in my son's room! I knew I w Another project down in my son's room!

I knew I wanted some sort of built-in feature in this bedroom, but it was hard to figure out what, because we turned it into an active space where he could run and play and needed a lot of room.

So I settled on a built-in bookcase with the slatted design feature, which I'm in love with!

The best part about it is that if he ever decides to upgrade his bed, the space will also accommodate a full or queen size bed going in the opposite direction. It adds so much interest to this room and hopefully will be here for a long time!

One of the things I love most about DIY projects is figuring out how to make something - it's like a giant puzzle. I saw photos of these slotted wall room dividers on Pinterest and just figured it out as I went. All in all, I had very few hiccups and it only took me a few hours to put together. I think I only cursed once?!? And so I call that an extreme DIY win...

Now that the sports wall, the climbing wall, and the built-in feature are complete, the last thing to do in here is some additional painting. I'm thinking of using a contrasting blue color for the closet doors and back side of the built-in, and perhaps trimming out the window with it as well. Then I need to switch out the light for a fan and this.room.is done 🙌

Details: I used two IKEA billy bookshelves, screwed together and secured to the wall. Then wrapped them in white oak plywood. I ripped down 2x4s into 1.5x1.5" square dowels (heavily sanded!) and used pocket holes on the back side of each to secure to the bookshelf and the 1x4 in the ceiling. It's very sturdy!

Go back in my reels to see the other projects from this room! 

#diy #boysroom #roomrenovation #roomrefresh #kidsrooms #climbingwall #soccerbedroom #builtins #bedroomredo #girlswhobuild
This climbing wall took half a day and cost under This climbing wall took half a day and cost under $100!

We are lucky enough to have 13' ceilings in our bedrooms, so a climbing wall seemed to make sense in my son's room as we worked on the remodel.

He is a super active kid with #ADHD, so his room redo has involved lots of activity spaces! Go back in my reels to see past projects and follow to see me finish this up!

#diy #roomrenovation #roomrefresh #kidsrooms #climbingwall #soccerbedroom
Another to-do checked off my list for spring break Another to-do checked off my list for spring break room makeover!

I added very subtle striping to the wall to mimic a soccer field and keep things classy. ⚽

Stick around to see the next project - a climbing wall!

(And go back in my reels to see the sports wall)

#roommakeover #soccer #kidsroom

Popular Posts:

Ikea Hack: DIY Mudroom Benches
Felt Food Patterns (Link Love)
Babyproofing the stair railings with plexiglass
DIY Outdoor Boot Rack

Recent Posts

  • Functional and Stylish Small Entryway Ideas for a Welcoming Space
  • Pendant & Accent Lights Under $100
  • DIY Stenciled Concrete Floors: Laundry Room Update Part 1
  • First Day and Last Day of School Questionnaire (free printables)
  • How to Create Canvas Wall Art from Digital Photos

>> ABOUT ME
>> DISCLOSURE STATEMENT
>> CONTACT ME

Copyright © 2025 themombot.com
Terms of Service // Privacy Policy