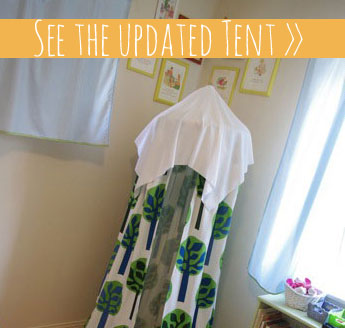
I am so proud to admit that I actually finished the tent for my daughter’s room last weekend – one of my top 10 DIY projects to complete in 2012. Woohoo!

I was inspired by an image I found on the Sew Liberated website, and basically figured out how to make it as I went. Here are the basic steps:
- I bought 3 yards of the tree fabric from Ikea. The print is a pretty decent match to the modern trees that cover two of the walls in the room.
- I cut the yardage in half and sewed each half together, lengthwise. I then hemmed all 4 edges.
- I made it similar to a curtain with tabs on the top, but instead of sewing both tab ends to the curtain, I sewed one end down and made the other attach to the curtain with velcro. This is so that I can attach it/detach it from the embroidery ring that I used at the top.
- The white fabric on top is a square scrap from an old curtain; I serged the edges and put a buttonhole in the very middle so I could slip it over the wooden ring.
- I used 5 pieces of hemp twine to attach the embroidery ring to the wooden ring at the top, spacing them out evenly around the hoop so that the tent hung even.
- I used the hemp twine again to hang the tent from the ceiling, knotting it around the wooden ring at the top of the tent and also at a keyhole screw in the ceiling.


I have no clue what’s it’s actually supposed to be used for, but it serves my purpose well!


If I could do it again…
This was really my first attempt at anything like this, and I wish I could have made a trial one before the final version. If I could do it again…
… I would use a larger embroidery ring at the top. I purchased the biggest one I could find at Michael’s craft store, but I may look online for a bigger one and switch it out in the future.
… I would have made sure that hanging it from the ceiling was going to work before I made the entire tent; when we went to hang it, we couldn’t find the stud in the ceiling and for a minute I was afraid all my work was for naught. We have an old house with plaster walls and who knew how they had constructed the ceiling; for a minute I thought there may not be studs to drill into. After putting about 6 holes in the ceiling with a drill, my husband went and bought a better stud finder and finally found the stud. Boy, did I breathe a sigh of relief… (we have yet to patch all the holes)
… I might buy lighter fabric… the tree print was a home décor fabric and rather heavy. The Sew Liberated tent that was my inspiration uses a lightweight, almost sheer fabric, and I like how it hangs. Mine looks as heavy as it weighs. I planned on using fishing wire to hang it, but had to switch to hemp cord because it was too heavy.
We are still working on turning my daughter’s room into a big girl room, and our next project is a DIY toddler bed (another project from my 2012 DIY list). Once the room is complete, I’ll be sharing photos of the whole thing. I can’t wait to show you the difference from nursery to big girl room!
—UPDATE:—
I traded out the embroidery hoop for a mini hula hoop at the top of the tent. It made all the difference! Check out the pictures and see my daughter’s new room reveal >>
Link Parties:
