• The Mombot
  • Gift Guides
  • My Story
  • Food & Drink
  • Life
  • Home
  • DIY
  • Mama Style
  • Shop

The Mombot

Motherhood Simplified.

How to Create Canvas Wall Art from Digital Photos

July 19, 2018 | Leave a Comment

Disclaimer: I received free product from Canvas on the Cheap in exchange for my honest opinion. Post contains affiliate links.

I always have a hard time decorating with photos. I don’t want my home to be a shrine to my kids or our family’s faces… it just feels wrong. But then, I also hate really posed pictures and intentionally tell photographers to capture candid photos of us, so maybe I’m just a weirdo about photos?

In any event, figuring out how to display our family’s photos and incorporate them into our decor has been a learning process. Over the years, I’ve learned that one of my favorite ways to do it has been by printing our digital photos on canvases. It feels like a step up from framed photos, and when I use those candid shots, it’s even a bit artsy!

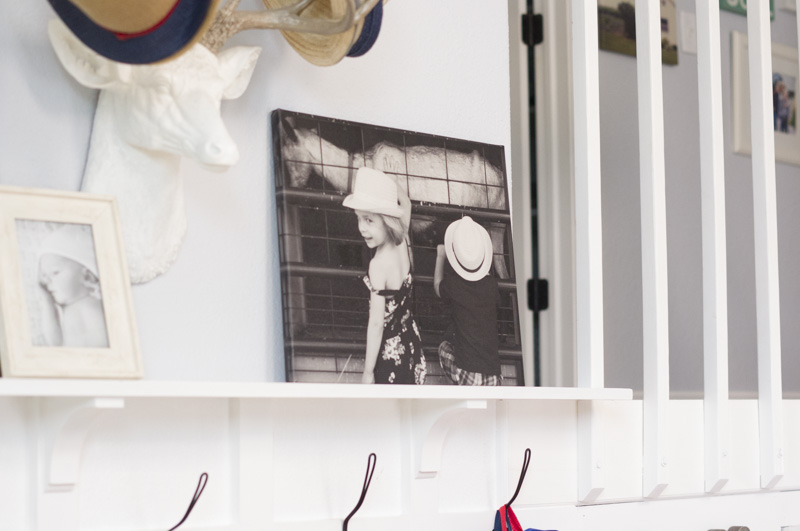
For example, I have a black and white canvas of my two oldest petting a goat at a farm; my son’s back is turned and my daughter is peaking over her shoulder. While it’s not the perfect photo of their sweet faces, I love the memories it evokes when I look at it. It was taken during our first long road trip to Michigan from Colorado, and it rests in my brain as my favorite summer trip with our little family to date.

canvas wall art, photo canvas collage, photo canvas sizes, canvas prints, best canvas prints, best photo canvas, canvas prints from digital photos, canvas wall art, canvas wrap prints, canvas picture prints, photo collage canvas

So when Canvas on the Cheap reached out to me to try out their photo canvases, I jumped at the chance; it had been a while since I had added any new photo canvas wall art.

canvas wall art, photo canvas collage, photo canvas sizes, canvas prints, best canvas prints, best photo canvas, canvas prints from digital photos, canvas wall art, canvas wrap prints, canvas picture prints, photo collage canvas

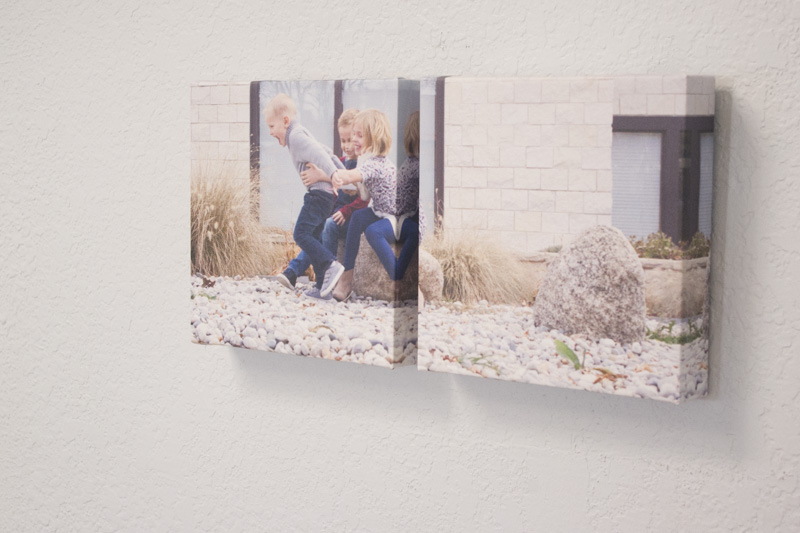
I had to think a bit about what photo to use, and I came across this one from our family photo shoot last fall. It is one of my favorite photos of my kids, because it perfectly displays their personalities!

canvas wall art, photo canvas collage, photo canvas sizes, canvas prints, best canvas prints, best photo canvas, canvas prints from digital photos, canvas wall art, canvas wrap prints, canvas picture prints, photo collage canvas

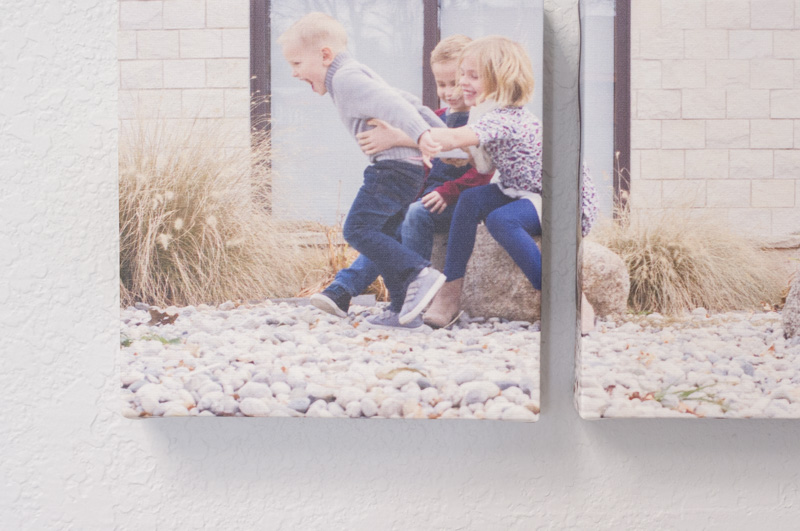
My youngest is a troublemaker who doesn’t know what “sit still” means, my daughter is ever the mommy, trying to be in charge, and my middle son is just that – always in the middle, usually not paying attention.

canvas wall art, photo canvas collage, photo canvas sizes, canvas prints, best canvas prints, best photo canvas, canvas prints from digital photos, canvas wall art, canvas wrap prints, canvas picture prints, photo collage canvas

I asked my husband whether I should use this photo or the one of them perfectly posed and he quickly said this one (I married the right man). So it was decided.

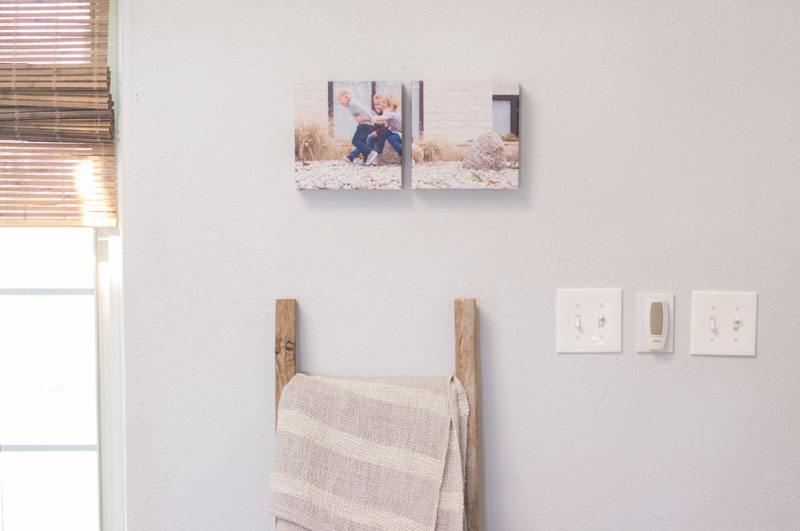
I wanted to create more of an art piece with this canvas, so I decided to create two split photo collage canvases. I have seen this done a few different ways, usually a square photo is split into 4’s or a 4×6 photo is split into three tall canvases. The composition in this photo worked well with two small square canvases.

canvas wall art, photo canvas collage, photo canvas sizes, canvas prints, best canvas prints, best photo canvas, canvas prints from digital photos, canvas wall art, canvas wrap prints, canvas picture prints, photo collage canvas

How to Create Split Photo Canvas Wall Art

Want to know how to create your own split photo canvas wall art? Here are two ways to do it:

  • Photoshop: In Photoshop, I created 2 canvases that were each 8″ by 8″. Then I resized my photo so that the width was 16″ and dragged my photo onto each canvas. I put the two canvases side by side and moved the photo right and left on each so until the edges aligned and they looked good to go. Then I saved each canvas as its own JPEG.
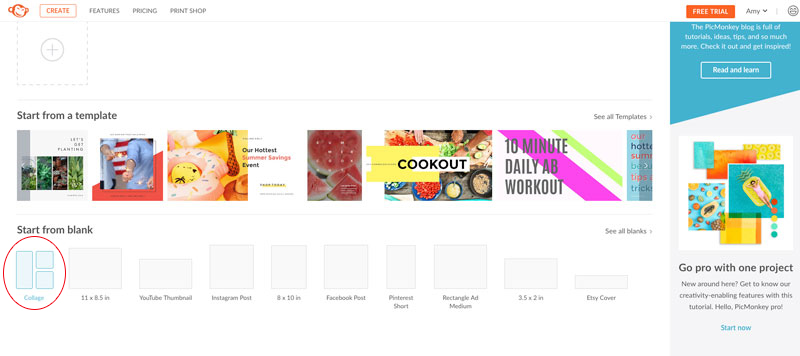
  • Free Photo Software: You can also use a free editor like PicMonkey to create your two canvases using their photo collage option. Here is an easy way to do it:

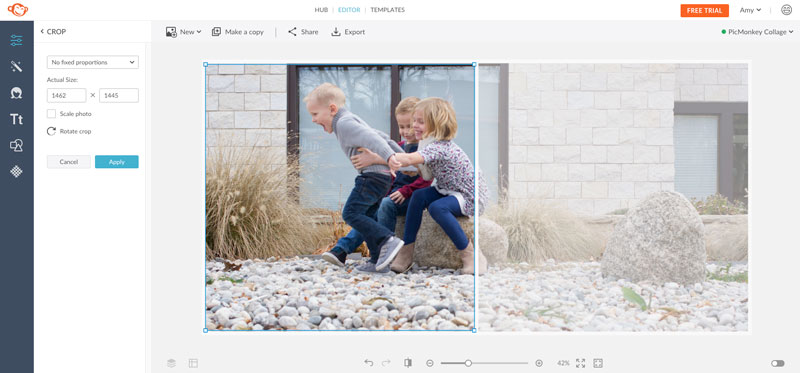
1. Login and select “collage” at the bottom of your home screen:

how to create split photo canvases, photo canvas collage, canvas prints from digital photos, canvas wall art, canvas wrap prints, canvas picture prints, photo collage canvas

2. Choose the first option “Ducks in a Row” with 2 images (you can obviously choose your collage layout appropriately if you plan on doing 3 or 4 split photo canvases instead of 2):

how to create split photo canvases, photo canvas collage, canvas prints from digital photos, canvas wall art, canvas wrap prints, canvas picture prints, photo collage canvas

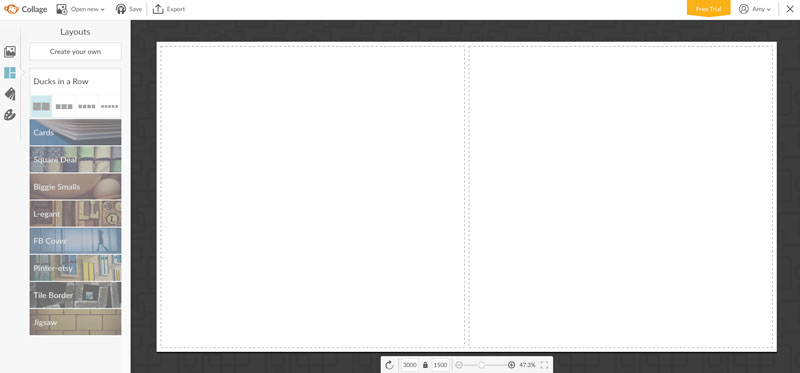
3. Doubleclick in each box to upload your photo. Upload the same photo to both boxes, then click the “edit” button in the middle of the canvas to resize and move your image so that the 2 sides align, as best you can tell.

how to create split photo canvases, photo canvas collage, canvas prints from digital photos, canvas wall art, canvas wrap prints, canvas picture prints, photo collage canvas

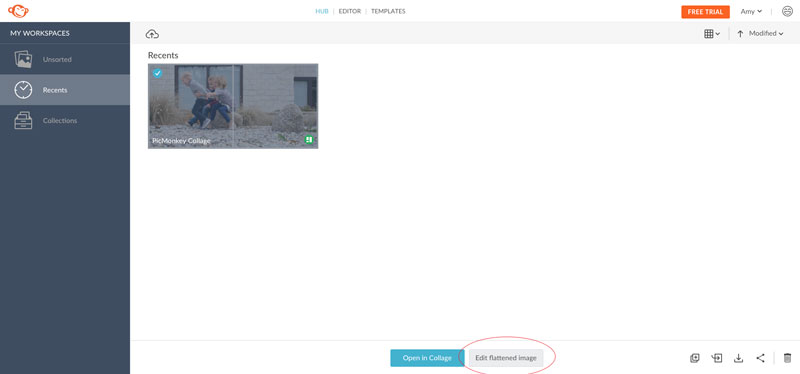
4. Click “save” at the top of the screen to save this image to your hub.

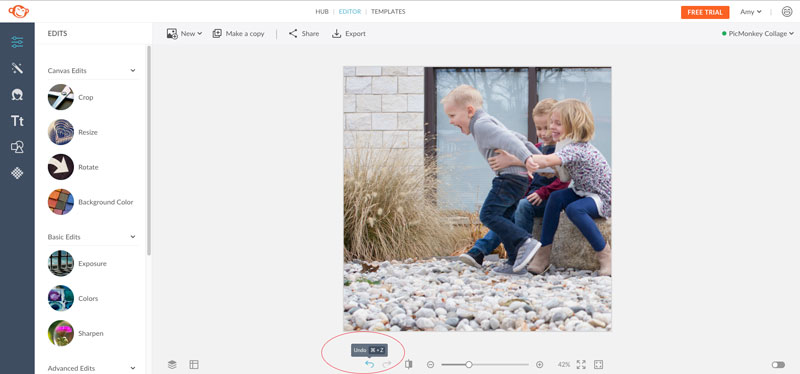
5. Navigate to your hub, select the image you just saved, and click “edit flattened image” at the bottom of the screen:

how to create split photo canvases, photo canvas collage, canvas prints from digital photos, canvas wall art, canvas wrap prints, canvas picture prints, photo collage canvas

6. Once it opens, you can use the crop tool on the left side to crop each individual square. Crop one, click “export” to save it to your computer, and then undo the cropping (using the “undo” button at the bottom of the screen) and crop the next square and export it to your computer.

how to create split photo canvases, photo canvas collage, canvas prints from digital photos, canvas wall art, canvas wrap prints, canvas picture prints, photo collage canvas

how to create split photo canvases, photo canvas collage, canvas prints from digital photos, canvas wall art, canvas wrap prints, canvas picture prints, photo collage canvas

Voila! You have 2 square JPEGS that align to now upload to Canvas on the Cheap!

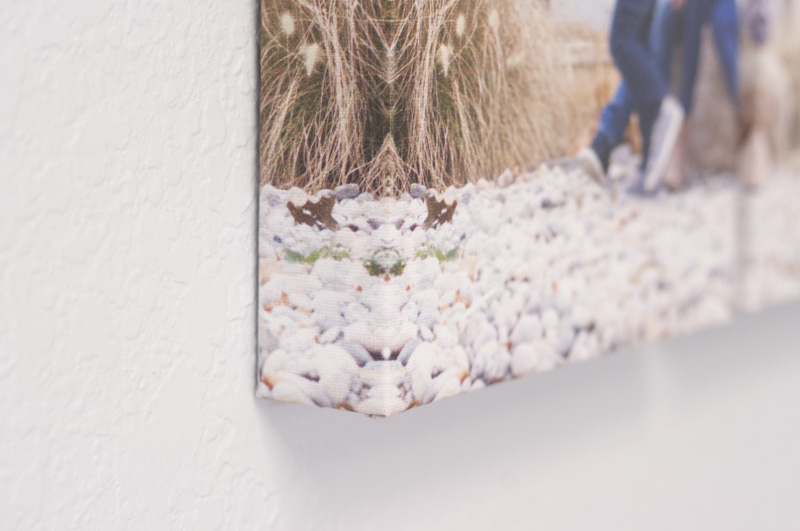
  • A note about margins: Some canvas websites require that you include a margin around your photo that will get wrapped around the frame. The great thing about Canvas on the Cheap is that you don’t have to worry about the margins for the wrap-around! Instead, they just print a mirror image of your photo edges to use as the wrap around; this way, it blends in with the picture on the front and saves you the headache of having to deal with margins. I thought this was genius! It would have been much more difficult when cropping my squares if I had to include a margin, and then I would have had to hope and pray that they frame it properly so that my canvases lined up.

how to create split photo canvases, photo canvas collage, canvas prints from digital photos, canvas wall art, canvas wrap prints, canvas picture prints, photo collage canvas

Canvas on the Cheap also has two framing widths you can choose; I went with the thicker option and I’m so glad I did. I love the dimension these split photo canvases have against the wall.

how to create split photo canvases, photo canvas collage, canvas prints from digital photos, canvas wall art, canvas wrap prints, canvas picture prints, photo collage canvas

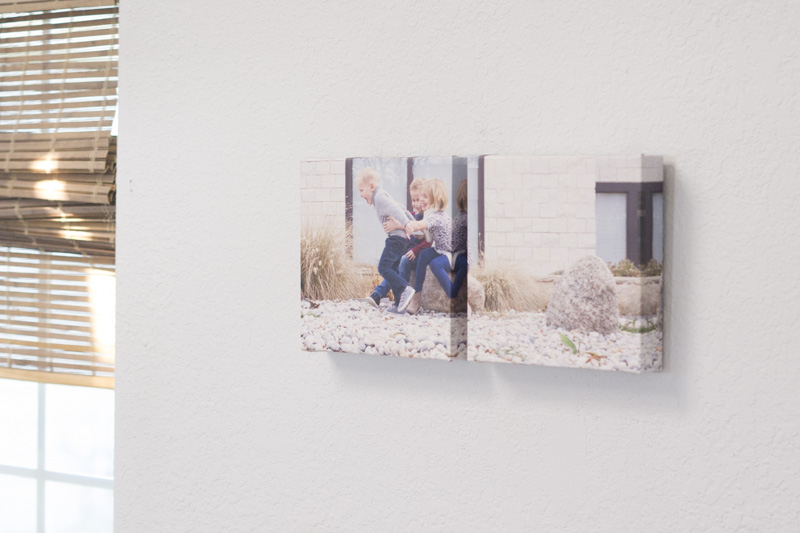
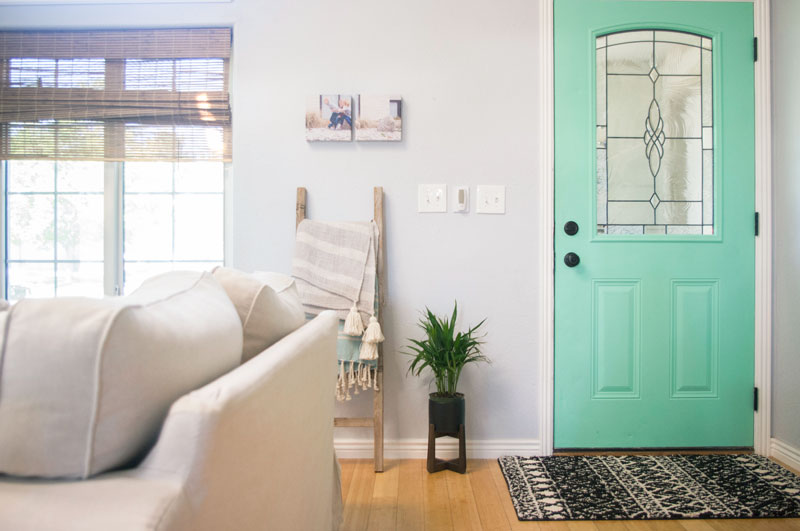
These little photo collage canvases turned out so cute! It’s great that they are small enough that they can go just about anywhere without being obnoxious or overwhelming. I change things pretty frequently on my walls, so I stuck them up with 3M velcro strips so they can easily be moved to another spot (you know, like next week).

Where would you put your canvas art? Are you brave enough to try a split photo canvas?

Related posts:

  1. Ikea Hack: DIY Mudroom Benches
  2. Fixer Upper Style: Industrial pipe shelving and shiplap
  3. Black and White Woodland Nursery
  4. Our IKEA mudroom benches, 3 years later

Filed Under: home Tagged With: home, home tour, how to, sponsored

  • Email
  • Facebook
  • Instagram
  • Pinterest
  • RSS
  • Twitter

HI! I'M AMY.

I'M A BLOGGER, GRAPHIC DESIGNER, MOM, COFFEE ADDICT, DIYER, CHRONIC MULTITASKER AND STRESSCASE, A COOK AND A LOVER OF A GOOD GLASS OF WINE.
LEARN MORE ABOUT ME

Shop My Paper Line:

Favorites:

Instagram:

I get it. It's a little weird. But the girls I've I get it. It's a little weird.
But the girls I've seen do it best, look adorable.

I think it looks best with an oversized tee or sweatshirt, tennies or slides, and a small crossbody bag.

You can't argue with comfort.

For the record, these are women's sleep shorts that I've had a couple of years from Old Navy. If you buy actual men's boxers, you might consider sewing up the pee pocket 😜

Don't spend a lot on this trend; these shorts are made from the thinnest of fabric and shouldn't cost much. Don't be fooled by a retailer that wants you to spend just because it's trendy.

But if you see some cute boxers and want to give it a go - then do! Bonus - if/when the trend ends, you'll have pajamas on the ready 👏

It's solid weekend wear, but I'm not going out to dinner in it...

#boxershortsforgirls #boxershort #ootd #womensfashion #styleinspiration
Another project down in my son's room! I knew I w Another project down in my son's room!

I knew I wanted some sort of built-in feature in this bedroom, but it was hard to figure out what, because we turned it into an active space where he could run and play and needed a lot of room.

So I settled on a built-in bookcase with the slatted design feature, which I'm in love with!

The best part about it is that if he ever decides to upgrade his bed, the space will also accommodate a full or queen size bed going in the opposite direction. It adds so much interest to this room and hopefully will be here for a long time!

One of the things I love most about DIY projects is figuring out how to make something - it's like a giant puzzle. I saw photos of these slotted wall room dividers on Pinterest and just figured it out as I went. All in all, I had very few hiccups and it only took me a few hours to put together. I think I only cursed once?!? And so I call that an extreme DIY win...

Now that the sports wall, the climbing wall, and the built-in feature are complete, the last thing to do in here is some additional painting. I'm thinking of using a contrasting blue color for the closet doors and back side of the built-in, and perhaps trimming out the window with it as well. Then I need to switch out the light for a fan and this.room.is done 🙌

Details: I used two IKEA billy bookshelves, screwed together and secured to the wall. Then wrapped them in white oak plywood. I ripped down 2x4s into 1.5x1.5" square dowels (heavily sanded!) and used pocket holes on the back side of each to secure to the bookshelf and the 1x4 in the ceiling. It's very sturdy!

Go back in my reels to see the other projects from this room! 

#diy #boysroom #roomrenovation #roomrefresh #kidsrooms #climbingwall #soccerbedroom #builtins #bedroomredo #girlswhobuild
This climbing wall took half a day and cost under This climbing wall took half a day and cost under $100!

We are lucky enough to have 13' ceilings in our bedrooms, so a climbing wall seemed to make sense in my son's room as we worked on the remodel.

He is a super active kid with #ADHD, so his room redo has involved lots of activity spaces! Go back in my reels to see past projects and follow to see me finish this up!

#diy #roomrenovation #roomrefresh #kidsrooms #climbingwall #soccerbedroom
Another to-do checked off my list for spring break Another to-do checked off my list for spring break room makeover!

I added very subtle striping to the wall to mimic a soccer field and keep things classy. ⚽

Stick around to see the next project - a climbing wall!

(And go back in my reels to see the sports wall)

#roommakeover #soccer #kidsroom

Popular Posts:

Ikea Hack: DIY Mudroom Benches
Babyproofing the stair railings with plexiglass
Felt Food Patterns (Link Love)
DIY Outdoor Boot Rack

Recent Posts

  • Functional and Stylish Small Entryway Ideas for a Welcoming Space
  • Pendant & Accent Lights Under $100
  • DIY Stenciled Concrete Floors: Laundry Room Update Part 1
  • First Day and Last Day of School Questionnaire (free printables)
  • How to Create Canvas Wall Art from Digital Photos

>> ABOUT ME
>> DISCLOSURE STATEMENT
>> CONTACT ME

Copyright © 2025 themombot.com
Terms of Service // Privacy Policy