• The Mombot
  • Gift Guides
  • My Story
  • Food & Drink
  • Life
  • Home
  • DIY
  • Mama Style
  • Shop

The Mombot

Motherhood Simplified.

DIY autumn burlap banner

November 10, 2014 | Leave a Comment

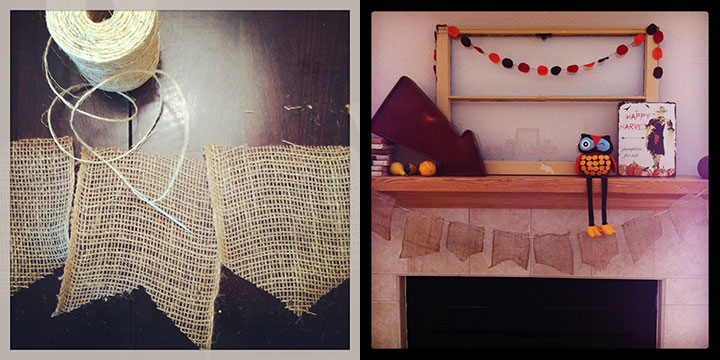
Last year I decided my mantel needed some sprucing up, so I took about 15 minutes to create a burlap banner using some simple burlap ribbon and twine. It hung over the fireplace during Thanksgiving and satisfied my need for something easy and fall-like.

DIY Burlap banner | TheMombot.com

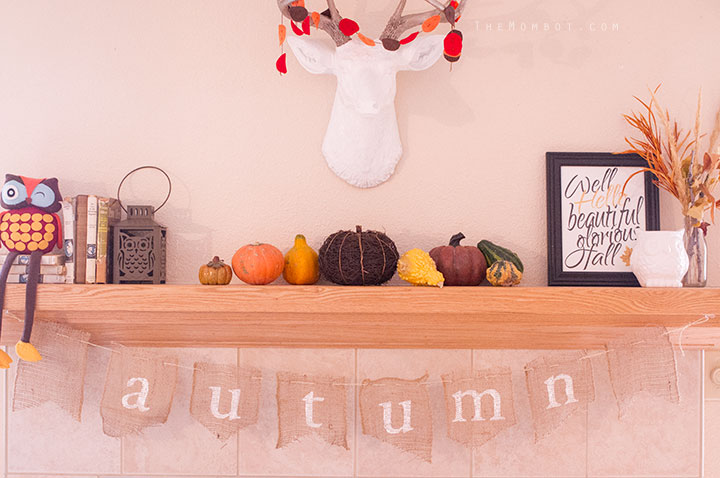
But this year, I decided it needed a little somethin’, somethin’ – especially because the burlap sort of blends in with the tiles surrounding my fireplace. So I went to town creating a stencil of the word “autumn” and painting it on my banner using white acrylic paint. The result was enough to make me go “yippee!” It looks 10 times better than it did last year and the upgrade literally took me 30 minutes.

DIY autumn burlap banner | TheMombot.com

DIY autumn burlap banner | TheMombot.com

Feeling in the mood for a little autumn DIYing? To make this banner in under an hour, here’s what you’ll need:

Supplies:

  • Burlap ribbon (mine is 6″ wide)
  • Twine/Hemp Cord
  • Big needle (I used a large plastic crochet needle)
  • White acrylic paint
  • “Autumn” stencil template (download here)
  • Xacto knife

Here’s how:

  1. Cut 8″ pieces from your 6″ ribbon (or adjust to size according to your ribbon width). If you’d like, vary the bottom edge of each piece to create different shapes like mine (some at an angle, some in a triangle point, some with an inverted triangle).
  2. Thread your needle with the twine and sew a couple of stitches through the top edge of each banner piece (make sure not to get too close to the edge since burlap unravels; 1″ is a safe margin). Keep threading banner pieces until you have achieved your desire banner length.
  3. Cut out your stencils with an Xacto knife from the download provided above, or make your own. My letters are about 3″ x 3″ in a serif font (Hoefler Text).
  4. Lay each letter stencil on top of a banner piece one by one and paint over the stencil with white acrylic paint and a wide brush. I used a stippling effect (dabbing up and down inside of sweeping side to side) when painting to keep my paint within the stencil. Each time you paint a new letter, lay down a fresh piece of newspaper or scrap paper underneath because burlap is very porous and the paint will soak through each time you stencil. If your banner has more than 6 pieces, you’ll have to center the word “autumn” and surround it with blank banner pieces.
  5. The best part is you get immediate satisfaction – since the banner needs to hang to dry, you can put it up in its final resting spot and enjoy it right away!

Need a visual?

Here’s a quick little video tutorial that I put together for the stenciling/painting process of the banner. It’s not rocket science, but sometimes a visual helps!


How to make a burlap autumn banner from Amy Taylor on Vimeo.

Related posts:

  1. Mason jar lid Halloween crafts
  2. Kid craft: Mason jar pumpkins
  3. DIY fall decor
  4. I went a little crazy with the spraypaint…

Filed Under: crafting Tagged With: fall

  • Email
  • Facebook
  • Instagram
  • Pinterest
  • RSS
  • Twitter

HI! I'M AMY.

I'M A BLOGGER, GRAPHIC DESIGNER, MOM, COFFEE ADDICT, DIYER, CHRONIC MULTITASKER AND STRESSCASE, A COOK AND A LOVER OF A GOOD GLASS OF WINE.
LEARN MORE ABOUT ME

Shop My Paper Line:

Favorites:

Instagram:

I get it. It's a little weird. But the girls I've I get it. It's a little weird.
But the girls I've seen do it best, look adorable.

I think it looks best with an oversized tee or sweatshirt, tennies or slides, and a small crossbody bag.

You can't argue with comfort.

For the record, these are women's sleep shorts that I've had a couple of years from Old Navy. If you buy actual men's boxers, you might consider sewing up the pee pocket 😜

Don't spend a lot on this trend; these shorts are made from the thinnest of fabric and shouldn't cost much. Don't be fooled by a retailer that wants you to spend just because it's trendy.

But if you see some cute boxers and want to give it a go - then do! Bonus - if/when the trend ends, you'll have pajamas on the ready 👏

It's solid weekend wear, but I'm not going out to dinner in it...

#boxershortsforgirls #boxershort #ootd #womensfashion #styleinspiration
Another project down in my son's room! I knew I w Another project down in my son's room!

I knew I wanted some sort of built-in feature in this bedroom, but it was hard to figure out what, because we turned it into an active space where he could run and play and needed a lot of room.

So I settled on a built-in bookcase with the slatted design feature, which I'm in love with!

The best part about it is that if he ever decides to upgrade his bed, the space will also accommodate a full or queen size bed going in the opposite direction. It adds so much interest to this room and hopefully will be here for a long time!

One of the things I love most about DIY projects is figuring out how to make something - it's like a giant puzzle. I saw photos of these slotted wall room dividers on Pinterest and just figured it out as I went. All in all, I had very few hiccups and it only took me a few hours to put together. I think I only cursed once?!? And so I call that an extreme DIY win...

Now that the sports wall, the climbing wall, and the built-in feature are complete, the last thing to do in here is some additional painting. I'm thinking of using a contrasting blue color for the closet doors and back side of the built-in, and perhaps trimming out the window with it as well. Then I need to switch out the light for a fan and this.room.is done 🙌

Details: I used two IKEA billy bookshelves, screwed together and secured to the wall. Then wrapped them in white oak plywood. I ripped down 2x4s into 1.5x1.5" square dowels (heavily sanded!) and used pocket holes on the back side of each to secure to the bookshelf and the 1x4 in the ceiling. It's very sturdy!

Go back in my reels to see the other projects from this room! 

#diy #boysroom #roomrenovation #roomrefresh #kidsrooms #climbingwall #soccerbedroom #builtins #bedroomredo #girlswhobuild
This climbing wall took half a day and cost under This climbing wall took half a day and cost under $100!

We are lucky enough to have 13' ceilings in our bedrooms, so a climbing wall seemed to make sense in my son's room as we worked on the remodel.

He is a super active kid with #ADHD, so his room redo has involved lots of activity spaces! Go back in my reels to see past projects and follow to see me finish this up!

#diy #roomrenovation #roomrefresh #kidsrooms #climbingwall #soccerbedroom
Another to-do checked off my list for spring break Another to-do checked off my list for spring break room makeover!

I added very subtle striping to the wall to mimic a soccer field and keep things classy. ⚽

Stick around to see the next project - a climbing wall!

(And go back in my reels to see the sports wall)

#roommakeover #soccer #kidsroom

Popular Posts:

Ikea Hack: DIY Mudroom Benches
Babyproofing the stair railings with plexiglass
Felt Food Patterns (Link Love)
DIY Outdoor Boot Rack

Recent Posts

  • Functional and Stylish Small Entryway Ideas for a Welcoming Space
  • Pendant & Accent Lights Under $100
  • DIY Stenciled Concrete Floors: Laundry Room Update Part 1
  • First Day and Last Day of School Questionnaire (free printables)
  • How to Create Canvas Wall Art from Digital Photos

>> ABOUT ME
>> DISCLOSURE STATEMENT
>> CONTACT ME

Copyright © 2025 themombot.com
Terms of Service // Privacy Policy