• The Mombot
  • Gift Guides
  • My Story
  • Food & Drink
  • Life
  • Home
  • DIY
  • Mama Style
  • Shop

The Mombot

Motherhood Simplified.

Kid craft: Mason jar pumpkins

October 18, 2013 | Leave a Comment

Mason jar painted pumpkins (kid craft) | TheMombot.com

I guess it’s a mason jar kind of week since I just talked about making pumpkins and other Halloween decor from mason jar lids on Wednesday. So let’s just continue on with the theme and discuss painted mason jar pumpkins – the perfect craft to do with your child this Halloween/fall.

Since Mia loves crafts (particularly painting), I am always trying to find something that she can create that won’t just get thrown in the trash (we are probably the #1 wasters of paper due to all the coloring and painting she does and the lack of space we have to hang her creations). I came across this craft in Family Fun magazine and was happy that she would get to create and I would get some decor out of it. Bonus: This craft cost me about $4.

Mason Jar Pumpkins

Pumpkin Mason Jar lights


Here’s what you’ll need:

  • Mason jars (I chose 3 of varying shapes and sizes, all found at the thrift store for under $1)
  • Orange acrylic paint
  • Paintbrush
  • Masking tape
  • Ribbon and felt if you want to add embellishments
  • Battery-operated candles (I buy mine in at the Dollar Tree in a 4-pack – what a steal!)
Mason jar painted pumpkins (kid craft) | TheMombot.com


Here’s how you do it:

  1. Wash your mason jars so they are good and clean.
  2. Create pumpkin faces using pieces of masking tape and scissors and place on your jars.
  3. Let you child go crazy painting the outside of the pumpkin with orange paint. Encourage them to get it even all around (big globs in one spot will need to be smoothed out), or if you’re like me, be total “anal crafting mom” and steal the paintbrush when they are done and go over all their work (this goes over better when they don’t see you doing it…).
  4. Let dry.
  5. Peel off the masking tape, starting at the corners and going slowly.
Mason jar painted pumpkins (kid craft) | TheMombot.com

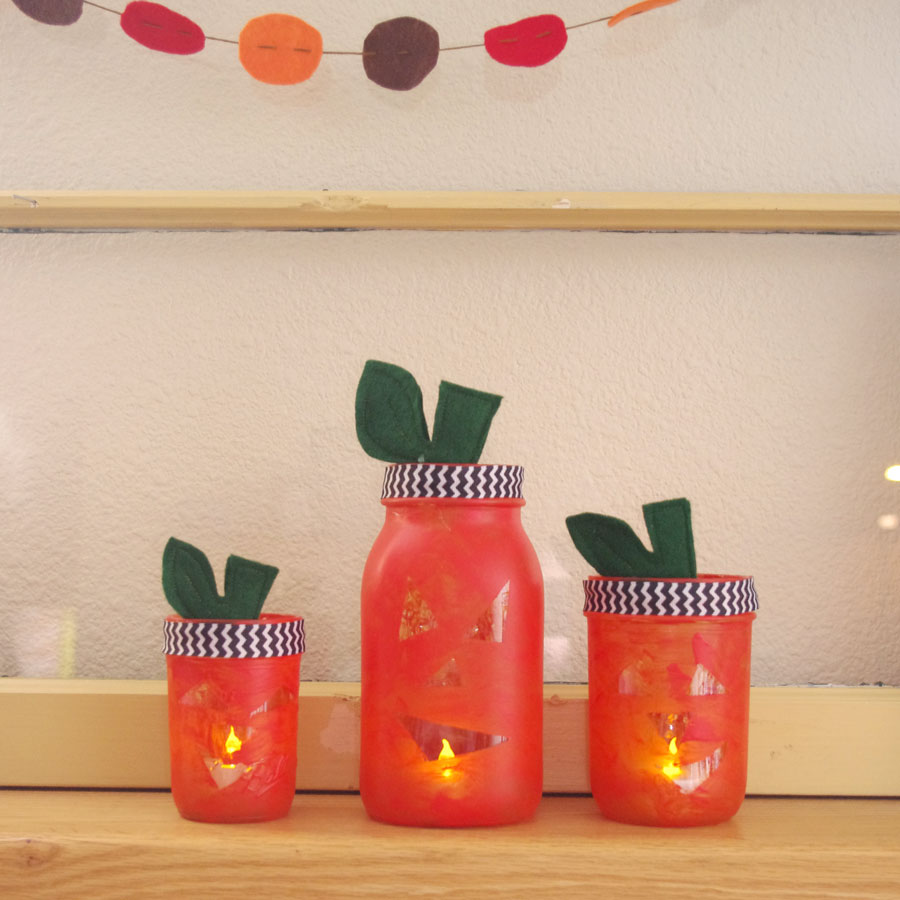
You could be done here, or you could add some embellishments like I did. I chose black and white ribbon and a stem/leaf which I think makes it a little more Halloween-inspired, but you could make it work more for fall by adding some raffia and faux leaves around the outer rim.

Mason jar painted pumpkins (kid craft) | TheMombot.com

To add embellishments:

  1. I created a little stem and leaf shape out of two pieces of felt and sewed them together with green thread on my sewing machine.
  2. Then, I hot glued my stem/leaf to the inside of the mason jar opening.
  3. Finally, I hot glued some ribbon around the outer rim of the jar.


Place your candles inside and enjoy!

Mason jar painted pumpkins (kid craft) | TheMombot.com

I’ve noticed that the better paint coverage your pumpkin has, the better your face will show once the candles are on. Our little pumpkins didn’t get quite as good coverage and the faces are therefore tougher to see than on the big jar, but they have lots of handmade character nonetheless!

Related posts:

  1. Easy DIY Halloween costumes for kids
  2. Mason jar lid Halloween crafts
  3. DIY toddler cowgirl costume
  4. Magnet Board Chore & Behavior Charts

Filed Under: crafting Tagged With: fall, for the kids, Halloween

  • Email
  • Facebook
  • Instagram
  • Pinterest
  • RSS
  • Twitter

HI! I'M AMY.

I'M A BLOGGER, GRAPHIC DESIGNER, MOM, COFFEE ADDICT, DIYER, CHRONIC MULTITASKER AND STRESSCASE, A COOK AND A LOVER OF A GOOD GLASS OF WINE.
LEARN MORE ABOUT ME

Shop My Paper Line:

Favorites:

Instagram:

I get it. It's a little weird. But the girls I've I get it. It's a little weird.
But the girls I've seen do it best, look adorable.

I think it looks best with an oversized tee or sweatshirt, tennies or slides, and a small crossbody bag.

You can't argue with comfort.

For the record, these are women's sleep shorts that I've had a couple of years from Old Navy. If you buy actual men's boxers, you might consider sewing up the pee pocket 😜

Don't spend a lot on this trend; these shorts are made from the thinnest of fabric and shouldn't cost much. Don't be fooled by a retailer that wants you to spend just because it's trendy.

But if you see some cute boxers and want to give it a go - then do! Bonus - if/when the trend ends, you'll have pajamas on the ready πŸ‘

It's solid weekend wear, but I'm not going out to dinner in it...

#boxershortsforgirls #boxershort #ootd #womensfashion #styleinspiration
Another project down in my son's room! I knew I w Another project down in my son's room!

I knew I wanted some sort of built-in feature in this bedroom, but it was hard to figure out what, because we turned it into an active space where he could run and play and needed a lot of room.

So I settled on a built-in bookcase with the slatted design feature, which I'm in love with!

The best part about it is that if he ever decides to upgrade his bed, the space will also accommodate a full or queen size bed going in the opposite direction. It adds so much interest to this room and hopefully will be here for a long time!

One of the things I love most about DIY projects is figuring out how to make something - it's like a giant puzzle. I saw photos of these slotted wall room dividers on Pinterest and just figured it out as I went. All in all, I had very few hiccups and it only took me a few hours to put together. I think I only cursed once?!? And so I call that an extreme DIY win...

Now that the sports wall, the climbing wall, and the built-in feature are complete, the last thing to do in here is some additional painting. I'm thinking of using a contrasting blue color for the closet doors and back side of the built-in, and perhaps trimming out the window with it as well. Then I need to switch out the light for a fan and this.room.is done πŸ™Œ

Details: I used two IKEA billy bookshelves, screwed together and secured to the wall. Then wrapped them in white oak plywood. I ripped down 2x4s into 1.5x1.5" square dowels (heavily sanded!) and used pocket holes on the back side of each to secure to the bookshelf and the 1x4 in the ceiling. It's very sturdy!

Go back in my reels to see the other projects from this room! 

#diy #boysroom #roomrenovation #roomrefresh #kidsrooms #climbingwall #soccerbedroom #builtins #bedroomredo #girlswhobuild
This climbing wall took half a day and cost under This climbing wall took half a day and cost under $100!

We are lucky enough to have 13' ceilings in our bedrooms, so a climbing wall seemed to make sense in my son's room as we worked on the remodel.

He is a super active kid with #ADHD, so his room redo has involved lots of activity spaces! Go back in my reels to see past projects and follow to see me finish this up!

#diy #roomrenovation #roomrefresh #kidsrooms #climbingwall #soccerbedroom
Another to-do checked off my list for spring break Another to-do checked off my list for spring break room makeover!

I added very subtle striping to the wall to mimic a soccer field and keep things classy. ⚽

Stick around to see the next project - a climbing wall!

(And go back in my reels to see the sports wall)

#roommakeover #soccer #kidsroom

Popular Posts:

Ikea Hack: DIY Mudroom Benches
Babyproofing the stair railings with plexiglass
Felt Food Patterns (Link Love)
DIY Outdoor Boot Rack

Recent Posts

  • Functional and Stylish Small Entryway Ideas for a Welcoming Space
  • Pendant & Accent Lights Under $100
  • DIY Stenciled Concrete Floors: Laundry Room Update Part 1
  • First Day and Last Day of School Questionnaire (free printables)
  • How to Create Canvas Wall Art from Digital Photos

>> ABOUT ME
>> DISCLOSURE STATEMENT
>> CONTACT ME

Copyright © 2025 themombot.com
Terms of Service // Privacy Policy